an open-source old newspapers distributor based on Lectura+ database. 📃
this project was
- initiated by Auvergne-Rhône-Alpes Livre et Lecture (Alizé Buisse and Priscille Legros)
- created, designed and developed by Léa Belzunces, Esther Bouquet and Déborah-Loïs Séry
All of the next steps have been developed for a raspberry pi 3 B+ running Stretch Version 9 and an Epson TM-T20III. The articles that you want to print need to be .txt files. The content needs to be in markdown with the following order:
- '#' → name of the newspaper
- '##' → title (h1)
- '#####' → subtitle (h2)
- '######' → subtitle (h3)
- '###' → text
- '####' → URL to the online article (to generate a qrCode)
- '#######' → category
You can link a .jpg or a .JPEG file to the corresponding .txt file (if the article contains an illustration for instance) by giving it the same name.
-
open your terminal
-
install dependencies:
sudo apt-get install python3 python3-setuptools python3-pip libjpeg8-dev -
write
sudo pip3 install python-escpos- if you have a MemoryError, try to run
pip3with--no-cache-dirsuch aspip3 --no-cache-dir install python-escposbut you should not need it - NB: sudo is very important if you want to run your script with systemd, otherwise you can't communicate to the usb with the root priviledge
- if you have a MemoryError, try to run
-
plug the usb cable of the thermal printer into the raspberry and turn the thermal printer on
-
get the Product ID and Vendor ID using
lsusbcommand- you should have something like:
Bus 001 Device 007: ID 04b8:0e28 Seiko Epson Corp.
The part that interests us isID 04b8:0e28where04b8is the vendor ID and0e28is the product ID
- you should have something like:
-
create the
udevrule file withsudo nano /etc/udev/rules.d/99-escpos.rules- write
SUBSYSTEM=="usb", ATTRS{idVendor}=="04b8", ATTRS{idProduct}=="0e28", MODE="0664", GROUP="dialout"where you replace04b8and0e28by your own ID
- write
-
use the
groupscommand line to check which groups you're part of- and add your username to the
dialoutgroup if you're not.
echo $USER
sudo adduser $USER dialoutwhere$USERis the name that appeared when you did the previous command
- and add your username to the
-
restart
udevwith the commandsudo udevadm control --reload(or)sudo service udev restart -
reboot your raspberry
-
open your terminal
-
create a new project folder using
mkdir nameofyourfolder -
go inside using
cd nameofyourfolder -
when you are in, write
touch nameofyourfile.py -
and write
sudo nano nameofyourfile.py(will open the file and let you write inside of it)-
inside the file, you can copy paste this snippet of code:
from escpos.printer import Usb

p = Usb(0x04b8, 0x0e28, 0)
p.text("hello human, i wish u a nice day\n")
p.cut()
📢 in
p = Usb(0x04b8, 0x0e28, 0)you need to replace04b8and0e28by your own vendor and product ID.
-
-
save the file and exit it
-
make sure the printer is plugged correctly
-
run
python3 nameofyourfile.py
if the installation worked, you should now have a tiny printed paper greeting you 🔖 otherwise, you can find more information here (raspi doc), or here (original github repo).
-
turn the printer on while pushing the feed button
- it prints a test
-
press the feed button again for more than 1 sec
-
Mode Selection opens
-
press shortly (<1 sec)three times the feed button and one time long (>1 sec) the feed button
-
it opens Customize Value Settings
-
press three times to open the density options and one time long (>1 sec) the feed button
- press three times to select density +2 and one time long (>1 sec) the feed button
-
press four times to open the speeed options and one time long (>1 sec) the feed button
- press eleven times to select speed 11 and one time long (>1 sec) the feed button
-
-
-
-
turn the printer off and restart it to use it
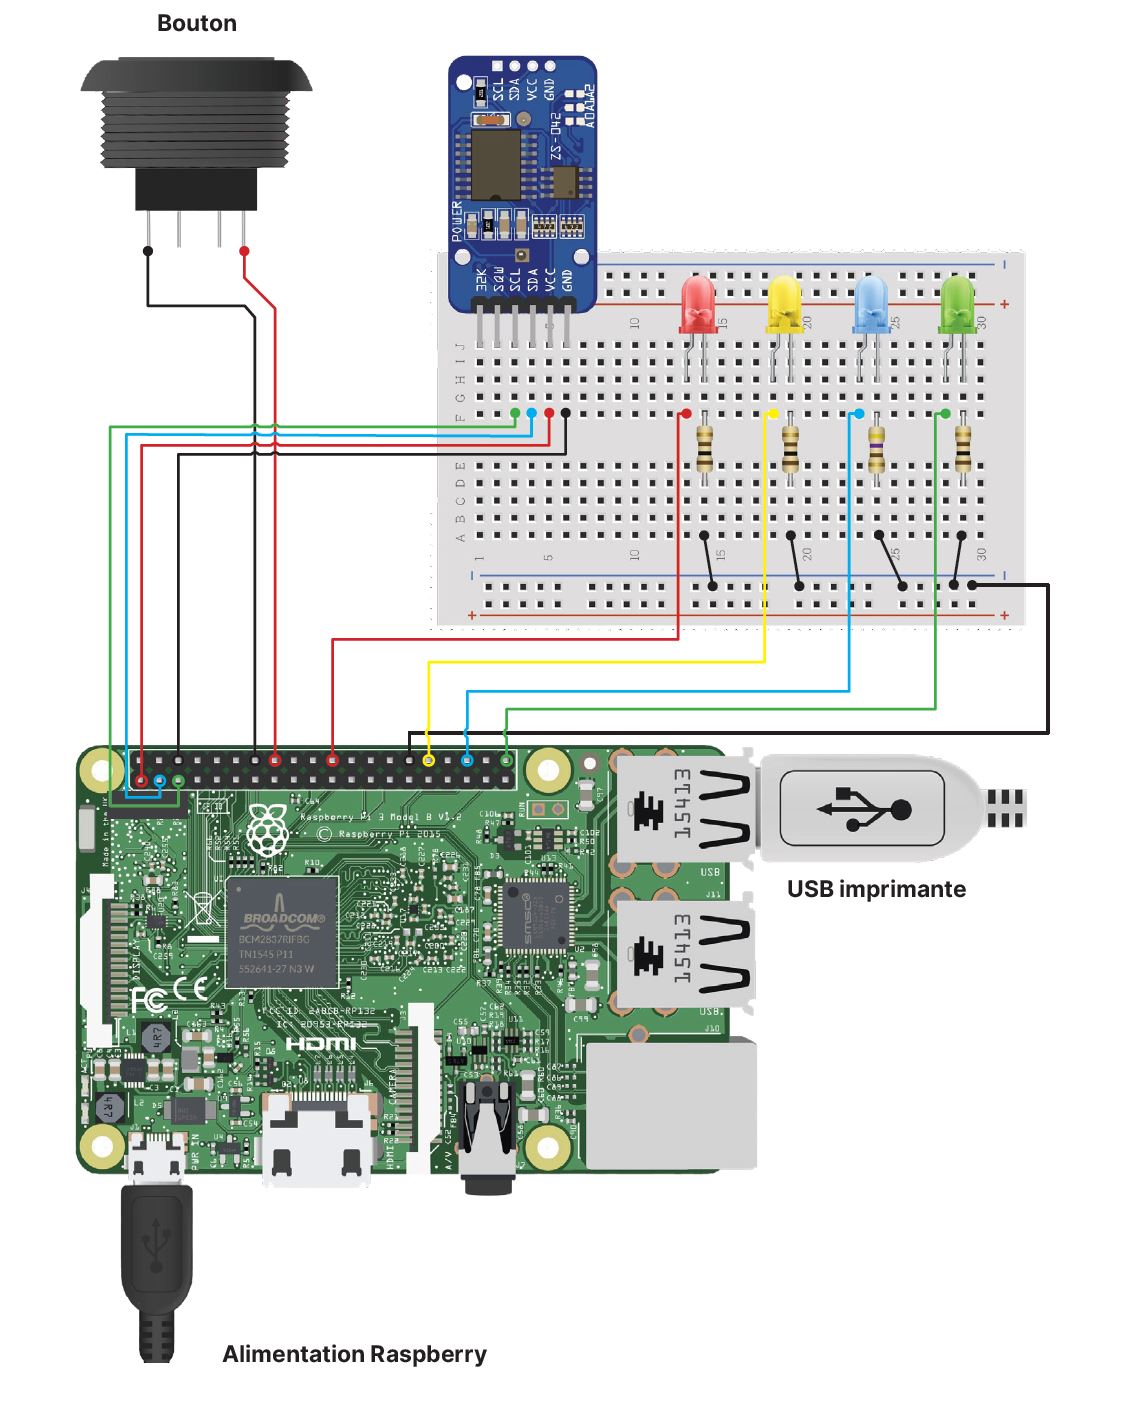
Because the code that launches the printer is linked to a physical button being pushed or not, we need to physically connect the button to the raspberry. We added at LED and resistor as there is no GUI involved in this project so it tells people that the print is being processed and they don't need to push the button again.
- Materials:
- 1 breadboard
- 1 pushed button
- 1 RTC (RealTime Clock - we chose the DS3231)
- 4 LED (1 yellow, 1 green, 1 red, 1 blue)
- 4 resistors (XX for the blue LED and XX for the yellow, red and green LED)
- 11 female-male cables
- 4 male-male cables
The Raspberry Pi is designed to be an ultra-low cost computer, so it doesn't have a little coin-battery-powered 'Real Time Clock' (RTC) module, which keeps time even when the power is off, or the battery removed. Instead, the Pi is intended to be connected to the Internet via Ethernet or WiFi, updating the time automatically from the global ntp (network time protocol) servers.
In our case, the raspberry has no network connection, so it will not be able to keep the time when the power goes out. This will lead to an error when we want to print an article at a specific date. To fix this problem you need to connect and install a RTC by following the steps on Adafruit's website. Don't forget to do sudo hwclock -s when you are done in order to set the System Time from the Hardware Clock.
-
open your terminal
-
check for updates
sudo apt-get update -
install wkhtmltopdf with qt patched (we need it to use
imgkit):sudo apt-get install xvfb wget https://github.com/wkhtmltopdf/packaging/releases/download/0.12.6-1/wkhtmltox_0.12.6-1.raspberrypi.stretch_armhf.deb sudo apt-get install ./wkhtmltox_0.12.6-1.raspberrypi.stretch_armhf.deb pip install coverage
📢 If you are not using Stretch, go here and replace
wkhtmltox_0.12.6-1.raspberrypi.stretch_armhf.debwith the right architecture for your distribution). -
install dependencies:
sudo apt-get install python3-markdownandpip3 install imgkit -
install dependency
pip3 install pyqrcodeand modulepip3 install pypng -
use
sudo apt install inotify-toolsso we can detect the usb drive later -
clone this repository using git in ./Documents/ and your ssh key OR download it on your raspberry in ./Documents/ with
git clone https://github.com/estherbouquet/lectura-plus -
Once it is cloned, go to ./lectura-plus/
-
install bash dependency
sudo apt-get install recodeand allow privileges by copyingchmod u=rwx encoding.shin the terminal and thenchmod u=rwx listeningForPushedButton.shandchmod u=rwx copy_from_usb.sh,chmod u=rwx delete_from_usb.shand finallychmod u=rwx listeningForUSB.sh. -
Render the fonts in the output result:
-
open the file explorer and go to
home/pi -
create a new folder named
.fonts -
make it visible with
ctrl+h -
copy the fonts in
home/pi/Documents/lectura-plus/assets/tohome/pi/Documents/.fonts. -
if you want to check manually that the program works first before running it independently when the raspberry starts:
- be sure to be in the
lectura-plusfolder. - write
python3 listeningForUSB.pyin the terminal. It will start listening for a USB named 'ajout' being plugged into the raspberry - plug the usb drive with a folder named
articles(inside of which you will have the articles you want to copy to the raspberry for a later print)./listeningForUSB.shis now supposed to launch./copy_from_usb.sh(will copy the content of ./articles/ and convert it)- if the red led is blinking eight times quickly, it means that there is no folder named
articlesdetected - if the green led is turning on it means that the program is working
- the blue led will turn on when all the files are copied (you can remove safely your usb at this moment)
- when the conversion is done, the green and blue led will turn off and the green led will blink one last time
- if the red led is blinking eight times quickly, it means that there is no folder named
- open a new terminal window, go back to
./Documents/lectura-plus/ - write
./listeningForPushedButton.shin the terminal and press the physical button whenever you feel ready- the led will blink twice if the program can find articles to print through the printer
- whenever you want to stop/quit, just close the 2 terminal windows.
- be sure to be in the
-
after you have checked that the two programs work when they are launched manually, you can run them automatically when the raspberry starts following the instructions below.
-
It is important that you check if your programs run flawlessly when you launch them manually before starting automatizing them.
We are going to create 2 .service files because we are going to use systemd.
- Do
cd /etc/systemd/system
sudo nano copy.service- copy paste the content of
copy.servicethat you can find in the/home/pi/Documents/lectura-plus/systemdfilesfolder - you can uncomment
StandardOutput=inheritand commentStandardOuput=nullto be able to track errors ctrl + oto write then pressenterto valid the modifications thenctrl + xto exit- you can check if it worked by using the command
cat copy.service📢 Everytime you need to do changes in this service file, don't forget to dosudo systemctl daemon-reloadso the changes are taken into account
- copy paste the content of
sudo systemctl start copy.service- you can check the status of the service (i.e. if it works) by typing
systemctl status copy.service(and usectrl + cto exit if necessary)- if it works correctly, a green "active" should appear in the terminal
- you can use
sudo journalctl -u copy.serviceto log errors - you can plug your usb. The green and then the yellow led should turn on
- if no errors are raised in the status mode when you plug the usb, it means that the program is working for far. Congrats!
- if no errors are encountered, the led will turn off meaning that the copy and conversion of the articles are over
- don't forget to uncomment/comment back
StandardOutputwhen you are sure the program is working - do a
sudo systemctl daemon-reloadso the changes are taken into account
- now, we can enable the service so it will run our program as soon as the raspberry boots. To do so:
sudo systemctl enable copy.servicesudo rebootand try to plug a usb drive when the raspberry is up and running!- know that if one day you want to disable the
copy.service, nothing simpler thansudo systemctl disable copy.service
sudo nano printer.service- copy paste the content of
printer.servicethat you can find in the/home/pi/Documents/lectura-plus/systemdfilesfolder ctrl + oto write then pressenterto valid the modifications thenctrl + xto exit- you can uncomment
StandardOutput=inheritand commentStandardOuput=nullto be able to track errors - do a
sudo systemctl daemon-reloadso the changes are taken into account - you can check if it worked by using the command
cat printer.service
- copy paste the content of
sudo systemctl start printer.service- you can check the status of the service (i.e. if it works) by typing
systemctl status printer.service(and usectrl + cto exit if necessary)- if it works correctly, a green "active" should appear in the terminal
- you can use
sudo journalctl -u printer.serviceto log errors - you can try to press the button. The blue led should blink twice and the printer print
- if no errors are raised in the status mode when you push the button, it means that the program is working. Congrats!
- uncomment/comment back the
StandardOutputlines - do a
sudo systemctl daemon-reloadso the changes are taken into account
- now, we can enable the service so it will run our program as soon as the raspberry boots. To do so:
sudo systemctl enable printer.servicesudo rebootand try to press the button when the raspberry starts up!- know that if one day you want to disable the
printer.service, nothing simpler thansudo systemctl disable printer.service
- to ensure that the raspberry takes the time from the RTC everytime it boots, we need to create a service too:
sudo nano clock.service- copy paste the content of
clock.servicethat you can find in the/home/pi/Documents/lectura-plus/systemdfilesfolder ctrl + oto write then pressenterto valid the modifications thenctrl + xto exitsudo systemctl enable clock.servicesudo rebootand try to press the button when the raspberry starts up!
- copy paste the content of
And now you're done! 🎉 Enjoy!