IPTUserManualv23.wiki
IPT Version: 2.3
For the IPT Version 2.2 user manual, please go here Otherwise, user manuals for older versions are available from the Version History page.
- Introduction
- Getting Started Guide
-
Quick Reference Guide
- Introduction
- Common features
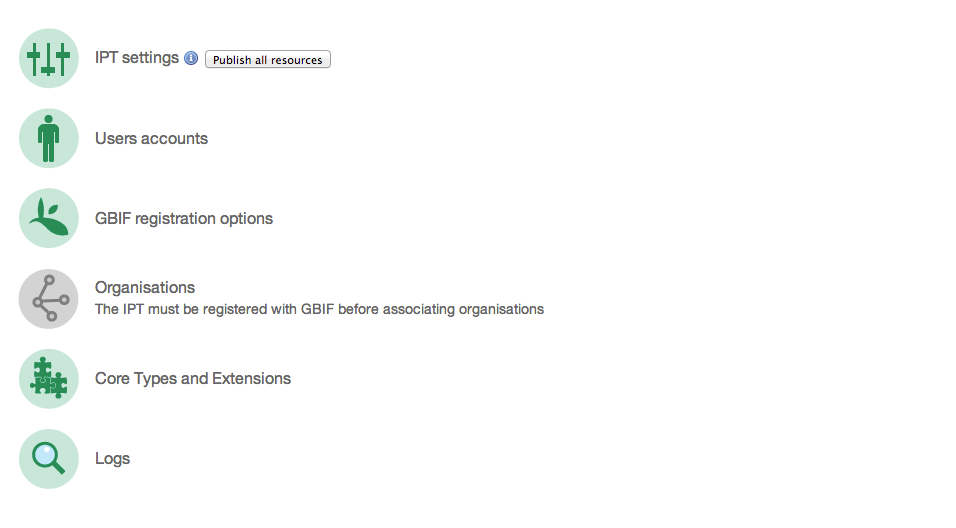
- Home Menu (visible to all users)
- Manage Resources Menu (visible to users with an Admin or Manager role)
- Administration Menu (visible only to users having the Admin role)
- Configure GBIF registration options
- Edit GBIF registration
- Configure Organisations
- Configure Core Types and Extensions
- View IPT logs
- About Menu (visible to all users)
- About the IPT
- Resources
- References
- Glossary
The GBIF Integrated Publishing Toolkit (IPT) is a freely available open source web application that makes it easy to share four types of biodiversity-related information:
- primary taxon occurrence data
- taxon checklists
- sampling event data
- general metadata about data sources.
An IPT instance as well as the data and metadata registered through the IPT are connected to the GBIF Registry, are indexed for consultation via the GBIF network and portal, and are made accessible for public use. More information about the GBIF IPT can be found at the IPT website.
Founded and funded by governments in 2001, The Global Biodiversity Information Facility (GBIF) is the world's largest multi-lateral initiative for enabling free access to biodiversity data via the Internet. GBIF's diverse Participants include primarily countries and international organisations. GBIF also has formal partnerships with relevant international treaty bodies. GBIF's mission is to promote and enable free and open access to biodiversity data worldwide via the Internet to underpin science, conservation and sustainable development. More information about GBIF can be found at http://www.gbif.org/.
Several factors have provided motivation for GBIF to lead the development of the IPT:
- limitations of previous publishing tools (DiGIR, TAPIR, BioCASE) to easily publish and transfer large datasets;
- the need to reduce the load on both the publisher's server, and GBIF's server during indexing. The reason being that indexing from DiGIR, TAPIR, or BioCASE caused heavy loads due to repeated HTTP request-response interactions.
- the need to speed up the process of indexing biodiversity occurrence datasets;
- the need to offer additional benefits and services to the data publishers to encourage data publication;
- the lack of appropriate tools to publish certain types of biodiversity data, such as names checklists and data set metadata.
This manual has three main components: an introduction with background information, a number of step-by-step tutorials and a complete reference guide including a "getting started" section and sections describing in detail the different elements of the tool.
All users are encouraged to review this introductory part and then refer to the different specific sections depending on their role(s) regarding the IPT installation. The IPT (and this manual) differentiates three type of users:
- Administrators: in charge of installing and configuring the IPT. They can make changes to all aspects of an instance of the IPT. Administrators should refer to the "Getting Started" and the "Administration Menu" sections of the reference guide.
- Resource Managers: they are able to create, edit, remove and manage resources (data sets and metadata). Depending on the settings they may have or not registration rights to publish resources through the GBIF Network. Resource managers should refer to the different tutorials depending on the type of data that they need to deal with (metadata, occurrences, special data types through extensions, etc.). The "Manage Resources Menu" section in the reference guide will also be very helpful for resource managers.
- Basic users: They can only browse the resources published in an IPT installation. In future releases of the IPT they will acquire further rights. For basic users the IPT works as a simple web application so no further explanation is included in this manual.
This Getting Started Guide is meant for those wishing to install and run an IPT instance for the first time. If you would like to see a functional installation of the IPT in action, you may use the public test instance of the latest general release version at http://ipt.gbif.org/. If you do so, refer to Quick Reference Guide for details on how to use the screens you will see. Developers who wish to work with the latest revision of the source code should consult the How to Contribute section of the GBIF IPT Google Code site wiki.
The IPT is designed under the assumption that the server on which it is run has consistent Internet connectivity. Though many functions of the IPT work even when offline, some aspects of the IPT (GBIF registration, extension installation, controlled vocabularies, and external databases for source data), require communication with external Internet resources. From the perspective of IPT administration and management, the speed of the Internet connection affects only such communications. Access to the IPT web application and its services from beyond a local intranet also requires consistent connectivity, and slow connectivity may have an adverse affect on these aspects, especially when transferring large data sets.
Though it can be used simply as a tool to generate Darwin Core Archives (see http://rs.tdwg.org/dwc/terms/guides/text/), the IPT is meant to be a discoverable and accessible Internet-based application and service. To support this functionality, the server on which the IPT is installed must be able to support access to the application and services through a stable URL.
The server hosting the IPT installation must make at least 256 MB RAM memory available to the application.
The space required by the IPT application is less then 20MB. The contents of the IPT data directory after installation require less than 1MB of disk storage, writable by the IPT. However, the content of the data directory will grow as resources are created, and will require space roughly equal to the size of the files or tables containing the imported data sets. A reasonable estimate for the size of a relatively rich occurrence data set is one kilobyte per record. Normal usage of the IPT appends information to the log files, which will grow over time, but which generally require minimal disk space.
The server hosting the IPT must have a version no less than Java 6 installed and functional prior to the installation of the IPT.
The IPT application comes packaged with Jetty and therefore requires no further servlet container. Nevertheless, the IPT can be deployed in another servlet container (e.g., Tomcat) that is already in use. Information about how to use various servlet containers with the IPT, and how to setup a virtual host name for your IPT can be found here.
Before installing the IPT, be sure that the intended hosting server meets the minimum specifications described in the sections under "Requirements", above.
The latest release of the IPT software is available for download as a WAR file (or Web application ARchive) from the IPT website. Download this file to the server on which the IPT will run. Developers or those wishing to use the latest revision of the source code should consult the How to Contribute section of the GBIF IPT Google Code site wiki.
Follow the normal process for deploying a web application to a servlet container. A wiki page with further information about specific installations can be found here.
Successful deployment of the IPT to the servlet container will make the IPT accessible through a web browser at a URL determined by the servlet's base URL followed by /ipt (e.g., http://localhost:8080/ipt). If the installation was successful, the initial IPT setup page will appear in a web browser using the IPT's URL.
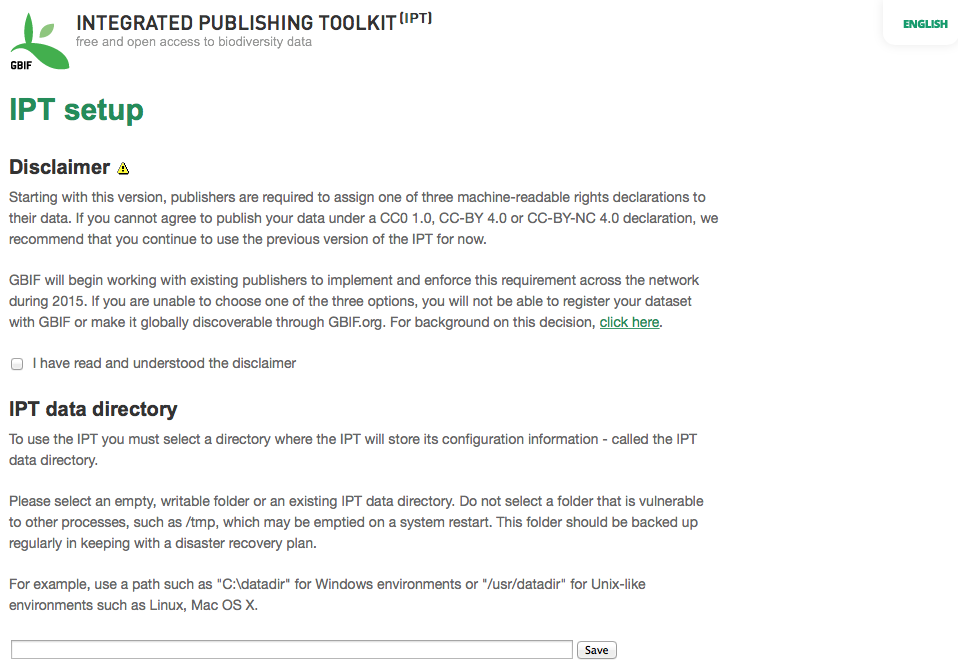
The first time the IPT is run, you will be presented with a few simple steps to prepare the IPT for use. The IPT setup page (see screen image, below) is the first of two setup pages. It requires publishers to confirm that they have read and understand a disclaimer regarding data licensing. Next it requires a location where the data for the IPT installation can be stored. The format of the location entered on the page must conform with the standard for an absolute path to a directory on the operating system where the IPT is installed; relative paths are not supported. For example, use a path such as "c:\datadir" for Windows environments or "/usr/datadir" for Unix and MacOSX environments. The IPT must have write permission to the selected location. If it does, the path can be entered in the text box provided and then click on the button labeled "Save" - the directory will be created if it doesn't already exist. It is permissible to create the data directory first with the appropriate write permissions, then enter the absolute path to the directory in the text box and click on the "Save" button.
Note 1: Do not select a data directory that is vulnerable to inadvertent changes or removal. Do not use /tmp, for example, on systems where this folder may be emptied on a system restart. The data directory should be backed up regularly in keeping with an appropriate disaster recovery plan. Loss of the contents of the data directory will result in the loss of resource, user, and other configuration information and customizations to the IPT installation.
Note 2: If you have a data directory from a previously running IPT of the same version and want to use that previous configuration (including users and resources), you can enter the absolute path of that data directory in this first step of the IPT setup (see also the "Starting Over" section of this Getting Started Guide). Clicking on "Save" in this case will bypass the page titled IPT setup II and present the IPT Administration page (see the screen image in the "Administration Menu" section of the Quick Reference Guide).
Note 3: Click on the language name in the upper right hand corner to see whether your preferred language is available to use the IPT in.
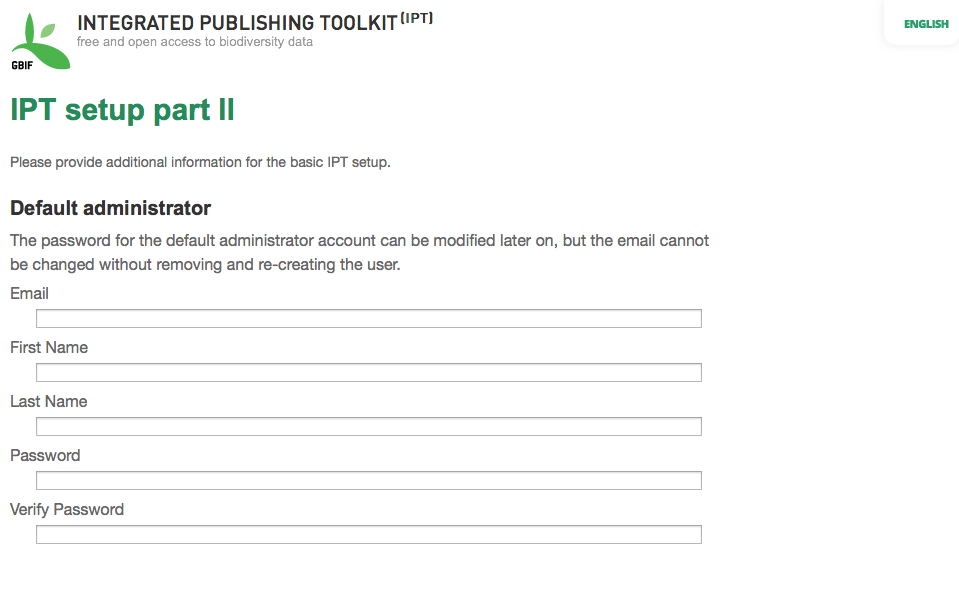
If the initial data directory assignment step was successful, the IPT will present a second setup page (see screen image, below) on which the information about the default administrator of the IPT must be entered, along with the information about what mode the IPT should run in, and how the IPT will be accessed from the Internet. Following are explanations of the fields encountered on the second setup page:
- Default administrator - The default administrator will have a distinct login and the authority to make changes to all aspects of the IPT installation. The default administrator will be able to make additional user accounts, including other administrators having the same authority to make changes. Though administrators can be added and removed, the IPT must always have at least one.
- Email - the full, active email address of the default administrator of the IPT installation.
- First name - the first name of the default administrator.
- Last name - the last name of the default administrator.
- Password - a password for the default administrator. Note: The password should be made secure and safe from loss, as it is not recoverable from the IPT application.
- Verify password - an exact copy of the password as entered in the Password text box to confirm that it was entered as intended.
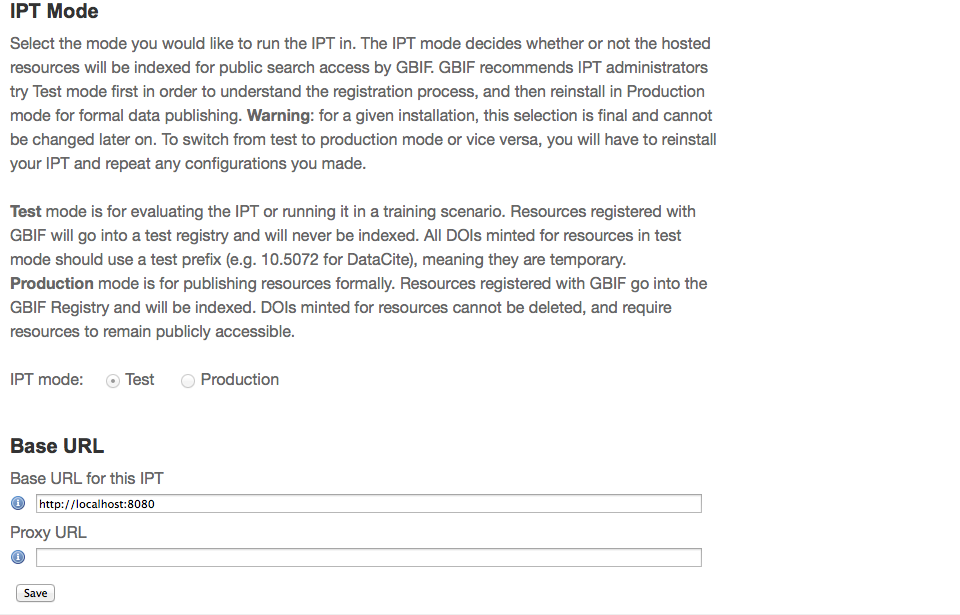
- IPT Mode - The IPT mode decides whether or not the hosted resources will be indexed for public search access by GBIF. GBIF recommends IPT administrators try Test mode first in order to understand the registration process, and then reinstall in Production mode for formal data publishing. Warning: for a given installation, this selection is final and cannot be changed later on. To switch from test to production mode or vice versa, you will have to reinstall your IPT and repeat any configurations you made. (see the "Starting Over" section in this Getting Started Guide).
- IPT mode - Choose between Test mode and Production mode. Test mode is for evaluating the IPT or running it in a training scenario, and registrations will go into a test registry and resources will never be indexed. All DOIs minted for resources in test mode should use a test prefix (https://blog.datacite.org/test-prefix-10-5072-retiring-june-1/), meaning they are temporary. Production mode, on the other hand, is for publishing resources formally, and resources are registered into the GBIF Registry and will be indexed. DOIs minted for resources cannot be deleted, and require resources to remain publicly accessible.
- Base URL
-
Base URL for this IPT - the URL that points to the root of this IPT installation. The URL is detected automatically if possible, but should be changed in production systems to be accessible via the Internet in order for the IPT to function fully. Configuring the IPT Base URL to use localhost, for example, will not allow the instance of the IPT to be registered with GBIF, will not allow the IPT to be associated with an organisation, and will not allow resources to be publicly accessible.
- Proxy URL - if the server on which the IPT is installed is routed through a proxy server or virtual host, enter the host address and port number through which the IPT will be accessible via the Internet as a URL in the format protocol:host:port, for example, http://proxy.gbif.org:8080.
-
Base URL for this IPT - the URL that points to the root of this IPT installation. The URL is detected automatically if possible, but should be changed in production systems to be accessible via the Internet in order for the IPT to function fully. Configuring the IPT Base URL to use localhost, for example, will not allow the instance of the IPT to be registered with GBIF, will not allow the IPT to be associated with an organisation, and will not allow resources to be publicly accessible.
When all of the information on the page is complete and correct, click on the button labeled "Save" to complete the IPT setup process. If a problem occurs, an error message will appear at the top of the page with recommendations about how to resolve the issue. Provided the issue has been resolved, restarting the web server will make it disappear. If the setup is successful, a page confirming the success of the setup will appear.
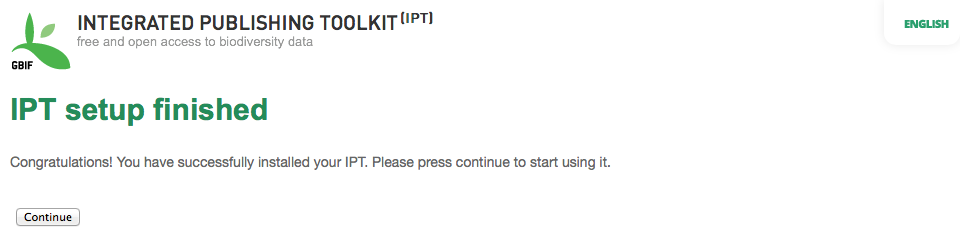
Click on the button labeled "Continue" to open the IPT Administration page (see the screen image, below), from which further configuration of the IPT can be accomplished. Please review the explanations of all of the Administration functions before continuing. Details about the options presented on this screen are given in the "Administration Menu" section of the Quick Reference Guide. Before adding data resources to the IPT, the administrator must, at a minimum, verify the IPT settings, set the GBIF registration options, and associate the IPT with an organisation. The Organisations button is disabled by default until the GBIF registration options have been set.
Once you have completed the steps in this Getting Started Guide, your IPT is ready to add resources (data sets and metadata). You may want to complete one or more of the tutorials to understand how common IPT tasks are accomplished. For detailed explanations of any further aspects of the IPT, consult the Quick Reference Guide of this user manual.
It is relatively easy to re-initiate the IPT and begin again with the first setup page by doing the following:
- Every user who is logged in to the IPT should first log out.
- Remove the file called datadir.location from the folder where it was created by the IPT (normally WEB-INF within the IPT base installation directory - not within the IPT data directory configured in the first setup step).
- The person having the default administrator information and knowledge of the IPT installation should open the IPT in a web browser. This will show the initial IPT setup page again (see the "IPT setup" section in this Getting Started Guide).
- If the user enters the same absolute path to the data directory as before, the previous configuration will be completely restored, assuming that there has been no incompatible upgrade in IPT versions between the time when the data directory was last used and when it is used to re-initiate the IPT.
- If the same data directory location is desired, but without the previous IPT configuration, then the contents of that data directory should be moved to a different location or removed entirely before clicking on "Save" in the initial IPT setup page.
- If an entirely new data directory is used, then the setup will proceed exactly as described in the "IPT setup" section of this Getting Started Guide.
This Quick Reference Guide explains in detail the capabilities of an IPT instance that has been installed, run for the first time, and tested to be functional as explained in the Getting Started Guide. The details of this guide are presented in four sections corresponding to the four "menus" available in the IPT user interface. Some tabs are only visible when a user having the appropriate rights to see them is logged in.
Most user interface controls have both enabled and disabled modes. If the control is enabled, it will either commit an action when clicked (a button, for example), or it will allow changes to be made to the value bound to the control (a text, check, or select box, for example). In the latter case the changes will be saved, if possible, when the form on which they appear is saved, which is generally accomplished on a given page by clicking on a button labeled "Save". Disabled controls show the value of the associated information, but do not allow that information to be saved under the conditions in effect at the time they appear. The purpose for most user interface controls is indicated by an associated label that appears above and/or to the left of the control. Sometimes supplemental information is also accessible from an associated information icon.
Menus - in the IPT, a menu bar appears below the GBIF logo on nearly every page. The menu bar is populated with menus that guide users to fundamental topics. Menu items appear based on the what the current user is authorized to see based on their role. The currently active menu is colored brightly, while inactive menus are grey. Click on a menu to open and activate the page for that topic.
Menu bar before login or after a user having no special role logs in, with the Home menu active:

Menu after a user having a Manager role logs in, with the Manage Resources menu active:

Menu after a user having the Admin role logs in, with the Administration menu active:

Text boxes - allow textual information to be viewed or entered.
Example text box and label for an email address:
Check boxes - allow a value to viewed or set to true (when checked) or false (when unchecked).
Example check box and label to indicate that the IPT can publish resources:

Select boxes - allows a value to be viewed or selected from a list of predefined values. A select box may contain explanatory text about the selection in place of a selectable value. In this case the selection will begin with "Select " (e.g., "Select a country, territory, or island"). Click on the select box to open it and see the list of possible values. Click on one of the choices to set that value.
Example select box and label for the user role, with Admin selected:

Links - opens a page other than the one on which the link occurs. Links may open the new page in the same browser window (or tab) or in a separate window (or tab).
Example link to the account information page for the logged in user:

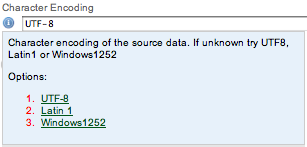
Information icon - shows a message explaining the intention of the control next to which it appears. Click on the icon next to any field to see a help message about that control. Click on it again to make the message disappear. Some information messages include a link, which, if selected, will populate the control with the appropriate value for the selection.
Example information icon for character encoding after the UTF-8 link was selected:
Documentation icon  - this icon indicates that there is a detailed information page about the subject with which the icon is associated. Click on the icon to open the page in a new browser window.
Trash icon  - this icon is associated with other controls on the page. Clicking on the icon will delete the associated data.
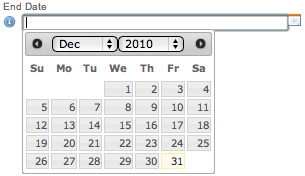
Calendar icon  - this icon is associated with a text field meant to contain a date. Clicking on the icon opens a small calendar with controls that allow the user to scroll forward and backward from the currently selected month and year, select boxes to choose a different month or year, and days of the week arranged in a standard New Era calendar. Selecting a specific day will place the date in the correct format into the associated text box.
Example calendar associated with an text box labeled "End Date" in which 31 Dec 2010 is the current date but not yet selected:
Sortable Table - a table that allows the rows to be sorted by the values of a selected column in ascending or descending order. The column headers are the labels for the columns, which appear as links. Click on a column header to sort the table using the values in that column. Click again on the same column header to sort the table in the opposite direction.
Example table sorted in ascending order by the column labeled "Name".

Example table sorted in descending order by the column labeled "Type".

Files can be uploaded in the IPT during two actions: when creating a new resource, or when adding new source data files.

The IPT has an upload size limit of 100MB. There is no limit to the size of Darwin Core Archive the IPT can export/publish though. For loading datasets larger than 100MB in size into the IPT, the following work-arounds are recommended:
- compressing the file (with zip or gzip)
- loading the data into one of the many databases supported by the IPT
- splitting the file up
This section describes several features that are accessible in the header and footer of most of the pages of the IPT.
The header section of the IPT appears in the upper right of most pages and allows basic control over the IPT, including who is using it, and in what language. Following are two screen images showing the two possible states in which the header may be found - logged in, and not logged in.
Header, not logged in, English language chosen for the user interface:

Header, logged in, English language chosen for the user interface:

- Login - A user who has already been created in this IPT instance can log in by entering the email address and password in the upper right-hand corner of the page, and then click on the "Login" link. Only an existing user having the Admin role can create new users. The process for creating new users is explained under the "Configure User accounts" heading in the "Administration Menu" section. The process of initializing the IPT creates the first user having the Admin role.
- Logout - If someone is logged in to the IPT, the email address of the person who is logged in is given in the upper right-hand corner of the page along with a "Logout" link.
- Account - To see this link and the page to which it leads, you must be logged into the IPT. The page shows the details of the account information for the person who is logged in to the IPT and allows them to be changed. The details of the fields found on this page can be found under the "Configure User accounts" heading in the "Administration Menu" section.
- Language selection - In the upper right-hand corner of the page is a name depicting the language in which the IPT is currently being presented. The default language for the IPT is English. The language of the user interface can be changed by selecting a name for the desired language, if available. GBIF actively seeks translations for the IPT into additional languages. For more information, consult the How to Translate page of the GBIF IPT Google Code site wiki.
The footer section of the IPT appears along the bottom of most pages and contains information about the IPT version and links to important resources.

- Version - At the left of the footer at bottom of the page is the version of the IPT that is currently running. The version information can be used to determine which features are included in the IPT and what bugs are known to exist. This is the version information that is requested when making bug reports.
- About the IPT - This link leads to the IPT website, where further information about the IPT can be found, including the version history, roadmap, uptake statistics, and further related documentation.
- User Manual - This link opens the most recently released online version of the IPT User Manual.
- Report a bug - This link opens the list of known open issues for the IPT. If you think you have encountered a bug, look at the list of known issues first to see if the bug has already been reported. If it has, you may add new information as a comment to the existing bug report that might help engineers to diagnose the problem and get it fixed. If no bug similar to the one you have encountered in the IPT appears on the list, you can create a new bug report by clicking on the "New issues" link. When entering a bug report, it is useful to include the version of the IPT you are using (see the explanation for "Version", above).
- Request new feature - This link opens a specific form in the IPT issue tracker that can be filled in to request a capability that the IPT does not currently have.
- Copyright - The copyright for the IPT software is held by the Global Biodiversity Information Facility. A link to the home page for GBIF is provided. Details of the copyright and licensing can be seen in the "About the IPT" section of this user manual.
This page allows users to view a list of public resources, if any, and to look at the detailed metadata of any resource on the list.
 ### Public Resources Table
If there are any public resources, they will appear in a table having the following columns:
### Public Resources Table
If there are any public resources, they will appear in a table having the following columns:
- Logo - the resource logo (configurable in Additional Metadata page of the resource metadata)
- Name - the title of the resource as given in the Title entry of the resource metadata. The Name appears as a link, which will open the resource's homepage (see below).
- Organisation - the organisation under which the resource has been registered, if any. If the resource is not registered, the value in the Organisation column will be "Not registered". Review the information under the "Organisations" heading in the "Administration Menu" section for more information about registering organisations and registering a resource under an organisation.
- Type - the type of the resource as given in the Type drop down on the Basic Metadata page of the resource metadata
- Subtype - the subtype of the resource as given in the Subtype drop down on the Basic Metadata page of the resource metadata
- Records - the number of rows of data in the core data file of the last published Darwin Core Archive for the resource. Last modified - either the date the resource was created or the date on which the data or metadata were last modified, whichever is more recent.
- Last publication - the date the resource was last published.
- Next publication - the date the resource will be published next.
The IPT supports syndication via RSS for those who wish to monitor when new resource versions get published, and how resources change over time. In fact each time a new resource version is broadcast, it will include a summary of what changed since the last version (assuming the publisher entered a change summary, otherwise it defaults to the resource description). The RSS feed is accessible by clicking on the link provided below the list of public hosted resources. The RSS feed can be read in any standard RSS client.
The IPT provides a simple JSON inventory of all registered resources. This feature isn't shown on the user interface. To view simply append /inventory/dataset to the IPT base URL, e.g. http://ipt.gbif.org/inventory/dataset. GBIF uses this inventory to monitor whether it is properly indexing resources by comparing the target and indexed record counts.
The resource homepage is aimed at external users of a resource. The homepage lists all the metadata about a selected version of a resource, provides links to download the version's data/metadata, and displays the resource's version history.
To view the resource homepage, user can click on the name link in the list of resources on the Home page. Another way to get to the resource's homepage is using its DOI: when a resource is assigned a DOI via the IPT, it always resolves to its homepage.
Please note only a user having the Admin role or one of the Manager roles can edit a resource's metadata. To learn more, please refer to the information under the "Edit an existing resource" heading in the "Manage Resources Menu" section.
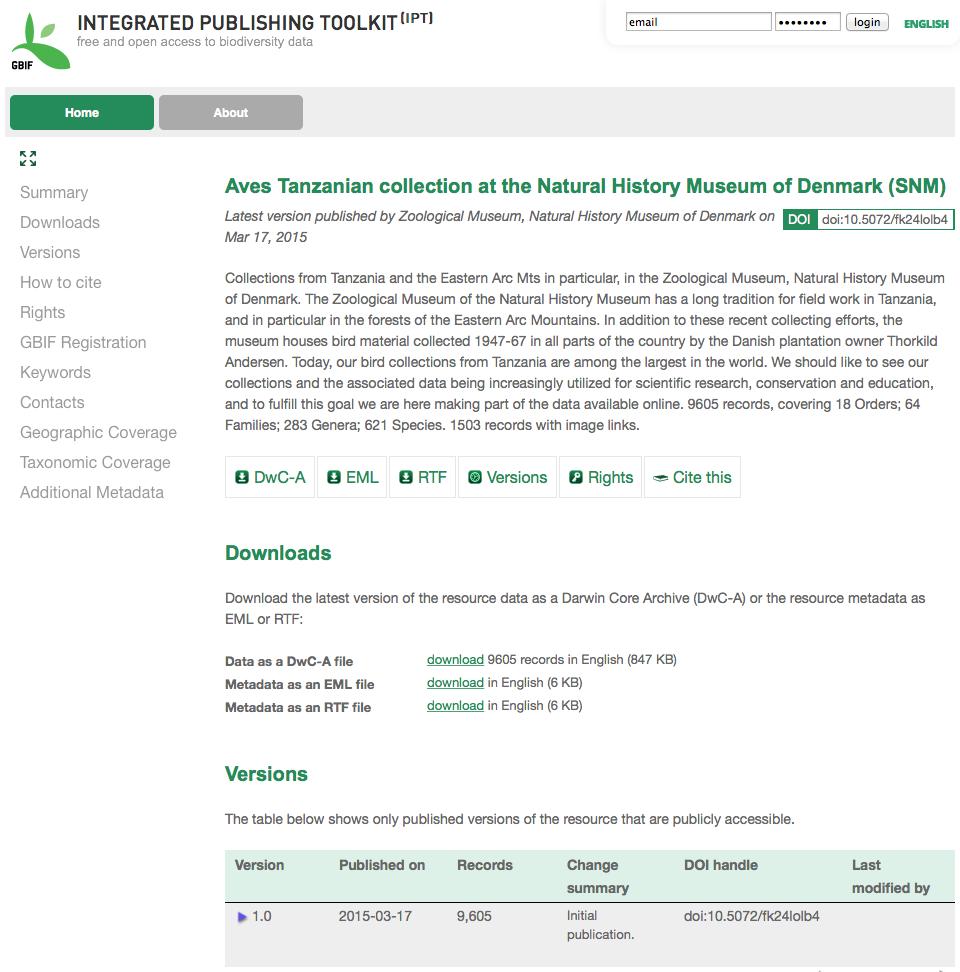
The version history table lists all published versions of the resource, enabling users to track changes to the resource over time and download previous versions' data/metadata. Please note, the IPT's Archival Mode must be turned on in order for old versions of DWCA to be stored (see Configure IPT settings section). Only versions that are publicly accessible can be viewed by external users, whereas admins and resource managers can see all versions. For explanations of the table columns, refer to the information below.
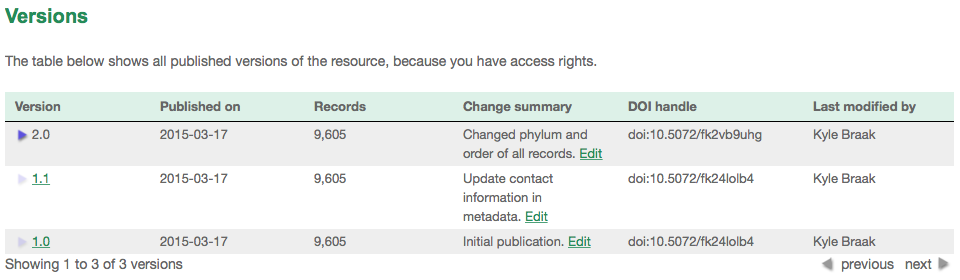
Following are explanations of the table columns:
- Version - the published version's version number, which uses the major_version.minor_version format. The version of the resource homepage currently being viewed is clearly indicated. To open a specific version's homepage, click on the version number. Note: A major version change compared to the last published version indicates that a scientifically significant change has taken place.
- Published on - the date the published version was released.
- Records - the number of records the published version contains.
- Change summary - a summary of what has changed since the last published version.
- DOI handle - the DOI handle assigned to the published version. Note: If the DOI is different from the DOI of the last published version, this indicates that a scientifically significant change has been done to the resource.
- Last modified by - the IPT user that last modified the published version.
This page allows users having the appropriate role (managers and administrators) to make changes to existing resources or to create new resources.

When the Manage Resources page is first opened, it shows a table of existing resources that the current user has permission to change, including those created by this user and those that this user has been invited to manage by others. Refer to the information under the Public Resources Table section for detailed explanations of the Name, Organisation, Type, Subtype, Records, Last Modified, Last publication, and Next publication columns. In addition, the Manage Resources Table includes the following column of basic information about the resources:
- Visibility - a category stating who has access to view the resource. If the resource is "Public", all users will be able to see it on the Public Resources Table on the Home page. If the resource is "Private", it will be visible in the Manage Resources table only to the user who created it, to those who have been invited to manage it, and to users having the Admin role. Details about inviting others to manage a resource are given in the "Resource Managers" section under the "Resource Overview" heading in the "Manage Resources" section.
- Author - the IPT user who created the resource.
Below the Manage Resource table is a form that can be used to create a new resource. First, a unique "shortname" must be provided for the resource. This short name will be used to uniquely identify the resource within the IPT instance, and will be used within the URL to access the resource via the Internet. The shortname must be at least three characters in length, may contain alphanumeric characters, but must not contain white space or punctuation other than hyphens or underscores (e.g., "firstresource" or "first_resource", but not "first resource" or "firstresource!"). Second, an optional resource type can be provided. Please note that when an optional archived resource is loaded (see below) the type will be determined automatically and overwrite this selection. Third, an optional archived resource can be uploaded. The following sections describe the 3 different types of archived resources from which a new resource can be derived: Darwin Core Archive, zipped (.zip) IPT resource configuration folder, metadata file.
Of course, you can always just create an entirely new resource without loading an existing archived resource. With this option the resource configuration will have to be created in its entirety through the IPT forms, including uploading source data files (or connecting to a database) and mapping the fields therein to terms in the appropriate extension or extensions. Please note the IPT has a 100MB file upload limit, however, there is no limit to the size of Darwin Core Archive the IPT can export/publish. Refer to the File upload section to find out how to work around the file upload limit.
Begin by entering a new resource shortname as described above, and then click on the button labeled "Create". This will open the Resource Overview page. Proceed by completing the various sections of the manage resource page based on the descriptions under the "Resource Overview" heading of the "Manage Resources Menu" section.
The IPT is able to import valid Darwin Core Archive files up to 100MB in size. Information about Darwin Core Archives can be found on the Darwin Core web site (http://rs.tdwg.org/dwc/terms/guides/text/), with further information about the IPT's use of them here. To import a Darwin Core Archive, click on the button labeled "Choose File", then navigate to and select the intended archive file. After selecting the file, its name will appear next to the "Choose File" button.

Click on the button labeled "Create". If there is a problem importing the selected file, an error message will alert the user. If the import is successful, a Resource Overview page will appear with an informational message at the top describing the results of the import process.

It is possible to create a copy of a resource from its zipped IPT resource configuration folder. The only condition is that the resource must have been created under a compatible version of the IPT. Effectively, this will copy all the resource's metadata, source data, and mappings. It will not copy the resource's registration information, version history, DOI(s), version number, managers, publication status, created date, last publication date, or even preserve the resource short name.
To do so, just follow these instructions:
- Locate the resource configuration folder corresponding to the resource you want to copy. The resource configuration folders are stored inside the $data-directory/resources folder, and named using the resource short name. For example, if the resource had short name "ants", it would be found at $data-directory/resources/ants.
- Zip (compress) the resource configuration folder: ants/ -> ants.zip
- On the "Create a New Resource" section on the "Manage Resource Menu" page:
- Enter a new resource short name. You can preserve the zipped resource's short name, provided it doesn't already exist in your IPT.
- Click on the button labeled "Choose File", then navigate to and select the intended zipped resource configuration folder.
- After selecting the file, its name will appear next to the "Choose File" button. Click on the button labeled "Create". If there is a problem importing the selected file, an error message will alert the user. If the import is successful, a Resource Overview page will appear with the resource metadata, source data, and mappings all copied from the zipped resource into the new resource.
The IPT is able to import and export valid dataset metadata files that conform to the GBIF Metadata Profile. Information about the GBIF EML Metadata Profile can be found in the GBIF Metadata Profile Reference Guide. Information about how to author a metadata document conforming to the GBIF Metadata Profile Darwin Core can be found in the GBIF Metadata Profile How To Guide. To import a metadata file, select the resource type "metadata-only", then click on the button labeled "Choose File", navigate to and select the intended metadata file. After selecting the file, its name will appear next to the "Choose File" button.

Click on the button labeled "Create". If there is a problem importing the selected file, an error message will alert the user. If the import is successful, a Resource Overview page will appear with the metadata having been populated. The source data and mapping sections will remain hidden since this is a metadata-only resource. Should you decide to add primary dataset at a later time, just change the resource type in the Basic Metadata page of the metadata.
The table of existing resources shows only those resources that can be edited by the current user. To edit a resource, click on the name of the resource in the table of resources. The link will open the Resource Overview page for the selected resource. Refer to the descriptions under the "Resource Overview" heading of the "Manage Resources Menu" section for details on how to edit various aspects of the resource.
This page allows users having managerial permission to make changes to various aspects of a resource's configuration. The name of the resource is given at the top of the page under the menu bar. If the resource has not been given a title, the resource shortname will appear at the top of the page and will act as a title instead. Below the resource name is a table showing categories of the resource configuration on the left with corresponding sections to the right. Information icons throughout the table can help guide managers in using each category. Each of these categories is configured separately as explained in detail in the following sections.

This area of the Resource Overview page allows a user to import primary data from files or databases into the IPT. If a resource has no source data it is considered a metadata-only resource, with information about a data set or collection, but without any primary data. It is possible to connect a resource to more than one data source if the sources are related to each other. More about relating multiple data sources is explained in the Implementation Guide section of the Darwin Core Text Guide. Following are explanations for the preliminary step of choosing the source data either from text files or from database sources:
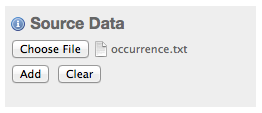
The IPT can import uncompressed delimited text files (csv, tab, and files using any other delimiter) or equivalent files compressed with zip or gzip. Excel files are also supported. Click on the button labeled "Choose File" to navigate to and select the file to import. The file name can only be composed of alphanumeric characters (A-Z, 0-9), white space, underscores, periods, parentheses, and hyphens. After selecting the file, its name will appear to the right of the "Choose File" button.

Click on the button labeled "Clear" to remove the choice of selected file and return to the previous state before any data source was selected. Or, click on the button labeled "Add" to open the Source Data File detail page (if there is the risk of overwriting a file with the same name, a dialog opens that asks the user to confirm they actually want to overwrite it). This page shows the name of the resource along with a summary of the file characteristics (readability, number of columns detected, absolute path to the file, the file size, the number of rows detected, and the date the file was last loaded into the IPT). The Source Data File detail page allows the user to view and edit the parameters that describe the content of the selected file, and to use these settings to analyze and preview the file.

- Source Name - the name of the file selected, without the file extension. Readable - this icon indicates whether data are accessible using the file format information provided on this page.
- Columns - the number of columns in the dataset as configured using the parameters on this page.
- File - the full path to the location of the file to use as the data source.
- Size - the file size.
- Rows - the number of rows found in the data file. (Note: This number helps check if all records are identified.)
- Modified - the date stamp of the file indicating when it was last saved.
- Source log - this link downloads the file containing the log produced when processing the file using the information contained on this page. Any problems encountered while processing the file, such as missing data and unexpected formatting will be in this log file.
- Analyze - click on this button to generate a data summary based on the database connection settings on this page. The analysis will indicate whether the database is readable, and if so, how many columns there are in the results of the SQL Statement.
-
Preview
 - click on this button to see an interpretation of the data based on the database connection settings on this page.
 - Number of Header Rows - 0 if the file does not contain a row of column names, 1 if the file does contain a header row.
- Field Delimiter - the character or characters that signify a break between columns of data.
- Character Encoding - the system that defines byte-wise definitions of the characters in the data (e.g., ISO 8859-5 refers to the Cyrillic alphabet).
- Field Quotes - a single character (or none) that is used to enclose the contents of a column in the data (e.g., ' or "). Please note this will not properly enclose columns whose content includes newline characters (\n) or carriage returns (\r).
- Multi-value Delimiter - a single character that delimits the values in a multi-value field (e.g., | or ;).
- Date Format - a code describing the format of fields having a date data type (e.g., YYYY-MM-DD for four-digit year, two-digit month, and two-digit day separated by dashes).
- Selected Worksheet - (Excel files only) this drop down lists the names of all worksheets in the Excel file/workbook. Only 1 worksheet can be used as the data source, defaulting to the first worksheet.
After the parameters for the data source have been set so that the file is interpreted correctly, click on the button labeled "Save" to store this configuration. If the save is successful, the Resource Overview page will appear, with summary information about the file in the right-hand column of the Source Data area. A button labeled "Edit" will also appear with the source data file summary information in the right-hand column, allowing the user to reopen the Source Data File detail page.

Should the user want to delete this source, they can reopen the Source Data File detail page and press the "Delete source file" button. Be aware though, that any mappings associated to this file will also be deleted.
If the source data are contained in multiple text files, the process described in this section can be repeated for each of the files to import. A zipped folder with multiple text files can also be imported to add multiple source files in one go.
The IPT can use database connections to import data from tables or views. A list of supported database connections is given on the Supported Databases page of the IPT Project wiki. To configure a database as a data source, click on the button labeled "Connect to DB" in the left-hand column of the Source Data area of the Resource Overview page. This will open a Source Database detail page.
The Source Database Detail page shows the name of the resource along with a summary of the database characteristics (readability, number of columns detected) and allows the user to view and edit the parameters that describe how to access the data from the database, and to use these settings to analyze and preview the data.

- Source Name - the name of the data source. Unlike a file data source, this can be edited and given any name by the user.
- Readable - this icon indicates whether data are accessible using the connection information provided on this page.
- Columns - the number of columns in the dataset as configured using the parameters on this page.
- Analyze - click on this button to generate a data summary based on the database connection settings on this page. The analysis will indicate whether the database is readable, and if so, how many columns there are in the results of the SQL Statement.
-
Preview - click on this button to see an interpretation of the data based on the database connection settings on this page.
- Database System - the relational database management system to which the IPT must connect to retrieve the data. Host - The database server address, optionally including the non-default port number (e.g., localhost or mysql.gbif.org:1336). For ODBC connections, this is not needed.
- Database - The name of the database in the database management system, or the DSN for an ODBC connection.
- Database User - the name of the database user to use when connecting to the database.
- Database Password - the password for the database user to connect to the database.
-
SQL Statement - The Structured Query Language statement used to read data from the source database. The statement will be sent as-is to the configured database, so you can use any native feature of the database such as functions, group by statements, limits, or unions, if supported. Example:
SELECT * from specimen join taxon on taxon_fk=taxon.idSELECT * from specimen join taxon on taxon_fk=taxon.idLIMIT 10 - Date Format - a code describing the format of fields having a date data type (e.g., YYYY-MM-DD for four-digit year, two-digit month, and two-digit day separated by dashes).
- Multi-value Delimiter - a single character that delimits the values in a multi-value field (e.g., | or ;).
After the parameters for the data source have been set so that the data are accessed correctly, click on the button labeled "Save" to store this configuration. If the save is successful, the Resource Overview page will appear, with summary information about the data in the right-hand column of the Source Data area. A button labeled "Edit" will also appear with the source data summary information, allowing the user to reopen the Source Database detail page.
This area of the Resource Overview page allows a user to map the fields in the incoming data to fields in installed extensions and to see which fields from the sources have not been mapped. This option is not available until at least one data source has been successfully added and at least one extension has been installed.
Once these conditions have been met, the left-hand column of the Darwin Core Mappings area will contain a select box with a list of Core Types and Extensions that have been installed. Select a Core Type and map that before selecting an extension to map. Select the appropriate extension that has fields matching the ones to map in the data source. If the appropriate core type or extension does not appear in the select box, it will have to be installed first. Refer to the information under the "Configure Core Types and Extensions" heading in the "Administration Menu" section for an explanation of how to install extensions.

After the desired core type or extension is selected, click on the button labeled "Add" to open the Data Source selection page.
This page gives an explanation of the type of data the extension is meant to support, and shows a select box containing a list of all of the configured data sources. Note 1: A resource must only use 1 core type: choose "Darwin Core Checklist" when the basis of the resource is taxon names, or choose "Darwin Core Occurrence" when the basis of the resource is occurrences in nature (observations) or in a collection (specimens). Only after the desired core type has been mapped, will it be possible to map other extensions. Note 2: It is possible to map another core type as an extension as long as it is different from the core type mapped.

Select the data source to map, and then click on the button labeled "Save". This will open the Data Mapping detail page (skip to the Data Mapping detail page below for help doing the actual mapping).
After a new mapping has been added, it will be visible in the right-hand column of the Darwin Core Mappings area. This area will contain a list of all the resource's mappings divided into Core Type mappings and Extension mappings. Click the "Edit" button beside a mapping to modify it, or click the preview icon to preview the mapping. Resource managers are advised to preview all mappings prior to publishing a new version.

After a mapping between a data source and Core Type or Extension has been created, this page opens and displays a status message showing how many fields from the data source were automatically mapped to the fields in the extensions. Fields are automatically mapped if the field names, converted to all lower case, match each other.

The Data Mapping page allows a user to specify exactly how the data accessible through this IPT resource are to be configured based on the selected extension. At the top of the page is description of what extension the source data is being mapped to. The name of the source data is a link back to the edit source data page. The name of the extension is a link to a description of the extension.
A sidebar on the left-hand side of the page has links to jump to specific sets of related fields (classes/groups) in the extension plus filters to show and hide fields on the page.
To the right of the sidebar are rows of information divided into two columns of information; the first column (left-hand side) lists the names of fields in the extension; the second column (right-hand side) contains a set of controls (select boxes, text boxes) to set the value the extension field is supposed to contain. If a field name has been chosen in the source data field select box, text labeled "Source Sample" and a button labeled "Translate" will appear below it. Descriptions of the controls that may appear in the right-hand column of the data mapping table are given below:
- Data source field select box - The left-hand select box is either blank or contains the name of a field from the data source. The IPT fills as many selections as it can from extension field names that match a data source field name. All of the remaining source field select boxes are left blank, signifying that the extension field has not been mapped to a source data field. If a field name is selected, the resource will use the value from that field in the source data as the value for the extension field in the Darwin Core Archive created by the IPT when the resource is published.
- Data source field select box - ID field - This field can be matched to a source data field, or it can be set to "No ID" signifying that the field will not be mapped to a source data field. The ID field is required in order to link records from the two sources together. The ID can be auto-generated from the "Line Number" or "UUID Generator", but this feature is exclusively available when mapping a source to the Taxon Core Type's taxonID field.
- Constant value text box - To set the published value of any non-identifier extension field to a single value for every record in the data source, enter the desired constant for the extension field in the text box to the right of the source field select box. To activate the text box, make sure that no value is selected in the source field select box. Example:
 * **Constant controlled value select box** - If the right-hand column for the extension field contains a second select box instead of a text box, this means that the field is governed by a controlled vocabulary. In this case, choose a value from the vocabulary list to use as a constant value in place of typing a constant into a text box.
 * **Use resource DOI** - (Special constant controlled value) It is possible to set the default value for datasetID equal to the resource DOI. This option only applies to extensions having the Darwin Core term datasetID, such as the Occurrence extension. To activate the checkbox, make sure that no source data field has been selected and no constant value has been entered.
 * **Vocabulary detail button** - Extension fields that are governed by a controlled vocabulary will have an icon beside the controlled value select box. Click on this icon to open a Vocabulary detail page in a new browser tab on which is a list of accepted values for the extension field with explanations and alternative synonyms in various languages.
* **Source Sample** - This area shows actual values from the first five records of the selected field of the source data, separated by spaces and the character '|'. This helps the user understand if the contents of the source data field are appropriate for the extension field to which it has been mapped.
* **Vocabulary detail button** - Extension fields that are governed by a controlled vocabulary will have an icon beside the controlled value select box. Click on this icon to open a Vocabulary detail page in a new browser tab on which is a list of accepted values for the extension field with explanations and alternative synonyms in various languages.
* **Source Sample** - This area shows actual values from the first five records of the selected field of the source data, separated by spaces and the character '|'. This helps the user understand if the contents of the source data field are appropriate for the extension field to which it has been mapped.
 * **Translate** - Click on this button to open a Value Translation page on which distinct values in the selected field of the source data can be translated to new values in the archive generated by the IPT for this data resource. After the translations have been entered and saved, the Data Mapping page will appear again, and will display text as a link in place of the "Translate" button to show the number of values for which there are translations having values different from the original values. Click on this link to reopen the Value Translation page for this extension field.
* **Filter** - The filter allows the user to include only records that match a criterion set for one of the source data fields. To use the filter, first select from the drop down whether you want the filter to be applied **After Translation** or **Before Translation** (in other words, after translations on the source data have been applied, or before - refer to Translation section above for more details about translation). Then, choose the field upon which the criterion will be based using the left select box. The text box at the right may contain a value against which to compare the value of the field in the source data. Do not enclose the value with any punctuation. The second select box allows the user to choose a comparison operator from among the following:
* **IsNull** - this operator is true if the source data field is empty. In this case no value is needed in the text box at the right. If there is a value in the text box, it will be ignored.
* **IsNotNull** - this operator is true if the source data field is not empty. In this case no value is needed in the text box at the right. If there is a value in the text box, it will be ignored.
* **Equals** - this operator is true if the source data field is equal to the value in the text box at the right. Equality is evaluated based on string matching, thus, if the data source value for a record is 2.0 and the value in the text box is 2, the record will not be included in the filtered data set.
* **NotEquals** - this operator is true if the source data field is not equal to the value in the text box at the right. Equality is evaluated based on string matching, thus, if the data source value for a record is 2.0 and the value in the text box is 2, the record will be included in the filtered data set.
* **Translate** - Click on this button to open a Value Translation page on which distinct values in the selected field of the source data can be translated to new values in the archive generated by the IPT for this data resource. After the translations have been entered and saved, the Data Mapping page will appear again, and will display text as a link in place of the "Translate" button to show the number of values for which there are translations having values different from the original values. Click on this link to reopen the Value Translation page for this extension field.
* **Filter** - The filter allows the user to include only records that match a criterion set for one of the source data fields. To use the filter, first select from the drop down whether you want the filter to be applied **After Translation** or **Before Translation** (in other words, after translations on the source data have been applied, or before - refer to Translation section above for more details about translation). Then, choose the field upon which the criterion will be based using the left select box. The text box at the right may contain a value against which to compare the value of the field in the source data. Do not enclose the value with any punctuation. The second select box allows the user to choose a comparison operator from among the following:
* **IsNull** - this operator is true if the source data field is empty. In this case no value is needed in the text box at the right. If there is a value in the text box, it will be ignored.
* **IsNotNull** - this operator is true if the source data field is not empty. In this case no value is needed in the text box at the right. If there is a value in the text box, it will be ignored.
* **Equals** - this operator is true if the source data field is equal to the value in the text box at the right. Equality is evaluated based on string matching, thus, if the data source value for a record is 2.0 and the value in the text box is 2, the record will not be included in the filtered data set.
* **NotEquals** - this operator is true if the source data field is not equal to the value in the text box at the right. Equality is evaluated based on string matching, thus, if the data source value for a record is 2.0 and the value in the text box is 2, the record will be included in the filtered data set.

 * **Required fields** - If there are any required properties that must be mapped for the Core Type or Extension, these have their names highlighted. Be aware basisOfRecord publication will fail if basisOfRecord has not been mapped for the Occurrence core. Also, a special case exists for the ID field, which is only required when linking two sources together.
In addition to the explanatory information about the extension at the top of the page and the two columns described above, the Data Mapping page may have following sections, links, and buttons:
- Resource Title - clicking on this link will navigate to the Resource Overview page without saving any of the pending changes.
- Hide unmapped Fields - this filter/link will remove from view on this page all fields that have not yet been mapped, leaving only those with completed mappings. To view again those fields that have not been mapped, click on the "Show all" link.
- Show all fields - this filter/link will make all fields visible, whether mapped already or not. This link appears only after the "Hide Unmapped Fields" link has been invoked.
- Hide redundant classes - this filter/link will remove from view on this page all fields belonging to classes/groups of terms that are redundant. A class is redundant, if it is already included in the core extension. To view again those fields that belong to redundant classes, click on the "Show all classes" link. This link appears only after the "Show all classes" link has been invoked.
- Show all classes - this filter/link will make all fields belonging to redundant classes/groups visible. This link appears only after the "Hide redundant classes" link has been invoked.
- Save - clicking on any of the potentially many buttons labeled "Save" will change the pending changes on the page.
- Delete - clicking this button will remove the entire mapping to a data source, not just the mapped fields, and return to the Resource Overview page.
- Back - clicking on this button will abandon all changes that have been made on this page since it was last saved and return to the Resource Overview page.
- Unmapped columns - this section contains a list of columns in the source file, table, or view that have not been mapped. This list can help to determine if everything from the source has been mapped that should be mapped.
 * **Redundant term classes** - this section contains a list of classes whose terms are redundant, meaning that these classes already appear in the core extension. Ideally, a term that has been mapped in the core extension doesn't need to be re-mapped again in an extension. Hiding redundant terms also has the additional benefit of making the mapping page easier to use for the user.

When this page opens for the first time it shows a message at the top giving the number of distinct values of the selected field in the source data, up to 1000 values. The page shows the name and description of the extension field for which translations are being made. If the field is governed by a controlled vocabulary, information about that vocabulary and an icon to open a Vocabulary Detail page (see Vocabulary Detail button explanation, above) will appear under the field description. Below the field description is a table showing the distinct values of the field found in the source data under the column heading "Source Value" with text boxes under the column heading "Translated Value". Enter the value to which the Source Value should be translated in the text box. The icon to the left of the translated value text box indicates if the value provided exists in the vocabulary for this term.
Bounding the table above and below by the following set of buttons:
- Save - click on this button to save all of the changes that have been made on this page and return to the Data Mapping page.
- Delete - click on this button to remove all translations for this field and return to the Data Mapping page.
- Reload - click on this button to search the source data again for distinct values. Existing translations are retained, and any new distinct values from the source data appear on the list without a translation.
- Automap - this button appears only if the field is governed by a controlled vocabulary. Click on this button to fill the Translated Values automatically with standard values based on known synonyms. Values in the source data for which there are no known synonyms will remain blank.
- Cancel - click on this button to close the Value Translation page without saving any of the changes that have been made.
This page shows a list of concepts within the vocabulary. In the context of mapping data, it shows a list of accepted values that can be used for the extension field. Each concept may contain a description, its preferred synonyms (in various languages), plus any alternative synonyms (in various languages).

This area of the Resource Overview page allows a user to edit the resource metadata. By clicking on the button labeled "Edit" in the panel to the left the metadata can be edited. The panel to the right shows when the metadata was last modified. Every resource requires a minimal set of descriptive metadata in order to i) be published in the GBIF network, ii) be registered with DataCite (in other words, be assigned a DOI). If any of the required metadata is missing, the Resource Overview page will open with a warning message in the Metadata area of the page.

Clicking on the "Edit" button opens the Basic Metadata page, the first of a series of metadata pages. Each page will appear in sequence as the button labeled "Save" is clicked upon finishing entering data on any given metadata page. Saving the metadata on the last of the metadata pages will transition back to the Basic Metadata page. Clicking on the button labeled "Cancel" on any given metadata page will disregard any changes made on that page and return to the Resource Overview page. In a column at the right of each metadata page is a list of links to all of the metadata pages for easy reference and navigation. Click on any of the links to open the metadata page for that topic.
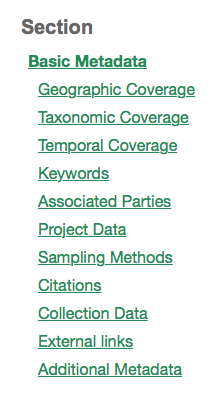
Following is a list of the metadata pages and their contents:
All metadata fields on this page are required. Please note for each contact you must supply at least a last name, a position or an organisation.

- Title - the Title for the resource. This title will appear as the Name of the resource throughout the IPT. The title will also appear in the GBIF Registry.
- Publishing Organisation - the organisation responsible for publishing (producing, releasing, holding) this resource. It will be used as the resource's publishing organisation when registering this resource with GBIF and when submitting metadata during DOI registrations. It will also be used to auto-generate the citation for the resource (if auto-generation is turned on), so consider the prominence of the role. If the desired organisation does not appear in the list it may be added by the IPT Administrator (see the information under the "Configure Organisations" heading in the "Administration Menu" section). Please be aware your selection cannot be changed after the resource has been either registered with GBIF or assigned a DOI.
- Update Frequency - the frequency with which changes are made to the resource after the initial resource has been published. For convenience, its value will default to the auto-publishing interval (if auto-publishing has been turned on), however, it can always be overridden later. Please note a description of the maintenance frequency of the resource can also be entered on the Additional Metadata page.
- Type - the type of resource. The value of this field depends on the core mapping of the resource and is no longer editable if the Darwin Core mapping has already been made. If a desired type is not found in the list, the field "other" can be selected. Review the information under the "Configure Core Types and Extensions" heading of the "Administration Menu" section.
- Subtype - the subtype of the resource. The options for this field depend on the Type field. If a desired subtype is not found in the list, the field can be left with the default selection.
- Metadata Language - the language in which the metadata are written.
- Resource Language - the language in which the data for the resource are written.
- Data License - the licence that you apply to the resource. The license provides a standardized way to define appropriate uses of your work. GBIF encourages publishers to adopt the least restrictive licence possible from among three (default) machine-readable options (CC0 1.0, CC-BY 4.0 or CC-BY-NC 4.0) to encourage the widest possible use and application of data. Learn more about GBIF's policy here. If you feel unable to select one of the three options, please contact the GBIF Secretariat at [email protected]. To find out how to apply a license at the record-level, refer to the How To Apply a License To a Dataset page in the IPT wiki. To find out how to change the IPT's default set of licenses, refer to the How To Add a New License page in the IPT wiki.
- Description - a brief overview of the resource broken into paragraphs. This should provide enough information to help potential users of the data to understand if it may be of interest.
-
Resource Contacts - the list of people and organisations that should be contacted to get more information about the resource, that curate the resource or to whom putative problems with the resource or its data should be addressed.

- Add new resource contact - click on this link to initiate a form for an additional resource contact.
- Remove this resource contact - click on this link to remove the resource contact that follows immediately below the link.
- First Name - the first or given name of the resource contact.
- Last Name (required if Position and Organisation are empty, required if the first name is not empty) - the last or surname of the resource contact.
- Position (required if Last Name and Organisation are empty) - the relevant title or position held by the resource contact.
- Organisation (required if Last Name and Position are empty) - the organisation or institution with which the resource contact is associated. Though the organisation may be one of those registered in the GBIF Registry, this is not required. Thus, the organisation must be entered in the text box rather than selected from a list of registered organisations.
- Address - the physical street or building address of the resource contact.
- City - the city, town, municipality or similar physical location of the resource contact's address.
- State/Province - the state, province, or similar geographic region of the resource contact's address.
- Country - the name of the country or other first level administrative region of the resource contact's address.
- Postal Code - the postal code (e.g., zip code) of the resource contact's address.
- Phone - the preferred full international telephone number at which to reach the resource contact.
- Email - the preferred email address at which to reach the resource contact.
- Home Page - the URL to a worldwide web page for the resource contact.
- Personnel Directory - the URL of the personnel directory system to which the personnel identifier belongs. There are four default directories to choose from: ORCID, ResearchID, LinkedIn, and Google Scholar. If you'd like to change the IPT's default set of directories, refer to the How To Add a New User ID Directory page in the IPT wiki.
- Personnel Identifier - a 16-digit ORCID ID (e.g. 0000-0002-1825-0097) or another identifier that links this person to the personnel directory specified.
- Resource Creators - the people and organisations who created the resource, in priority order. The list will be used to auto-generate the resource citation (if auto-generation is turned on). If this person or organisation is the same as the first resource contact, all of the details of the latter can be copied into the equivalent fields for the resource creator by clicking on the link labeled "copy details from resource contact". The resource creator has all of the same fields and requirements as the resource contact. Refer to the field explanations under Resource Contacts, above. Note: the person(s) or organisation(s) responsible for the creation of the resource as it appears in the IPT and for effectively publishing the resource can add themselves as an associated party with role 'publisher'.
- Metadata Providers - the people and organisations responsible for producing the resource metadata. If this person or organisation is the same as the first resource contact, all of the details of the latter can be copied into the equivalent fields for the resource creator by clicking on the link labeled "copy details from resource contact". The metadata provider has all of the same fields and requirements as the resource contact. Refer to the field explanations under Resource Contacts, above.
This metadata page contains information about the geographic area covered by the resource. The page contains a map and associated controls that allow the user to set the geographic coverage. Below is a screen image showing the contents of the Geographic Coverage page, followed by explanations of the controls.

- Coverage Map - if connected to the Internet, a Google Map of the earth will appear on the geographic coverage page. This map shows a box with control points (markers) on opposite corners. The corners correspond with the values in the Latitude and Longitude text boxes, explained below. Click on a marker and drag it to a new location to reset the geographic bounds of the box. The corresponding latitude and longitude values will change to match the box on the map. Both markers can be dragged in this way. The map has common viewing features of Google Maps, including a scale bar, a select menu to view different layers (terrain, satellite imagery, etc.), and buttons to zoom in (+) and zoom out (-).
- Set global coverage? - click on this check box to change the geographic coverage to cover the entire earth.
- West/East/South/North - these four text boxes correspond to the corners of the box bounding the area covered by the resource. The values to enter in these text boxes are decimal degrees (e.g. 45.2345), with the standard limiting values of -90 to +90 latitude (South/North) and -180 to +180 longitude (West/East), with positive latitude in the northern hemisphere and positive longitude east of the Greenwich Meridian to the International Dateline. Manipulating the bounding box markers on the map will set these values, but valid values can all be entered in these text boxes directly if desired. The map will update when the information on the page is saved by clicking on the button labeled "Save".
- Description - a textual description of the geographic coverage. This information can be provided in place of, or to augment the information in the other fields on the page.
This metadata page allows the user to enter information about one of more groups of taxa covered by the resource, each of which is called a taxonomic coverage. Each coverage consists of a description and list of taxa, where each taxon consists of a taxon name (either scientific or common) and a taxon rank. Before any taxonomic coverages are created, the page shows only a link labeled "Add new taxonomic coverage". Clicking on this link will show a text box for the description and several links. Below is a screen image showing the Taxonomic Coverage page before any data have been entered, followed by explanations of the controls seen on the page in this state.
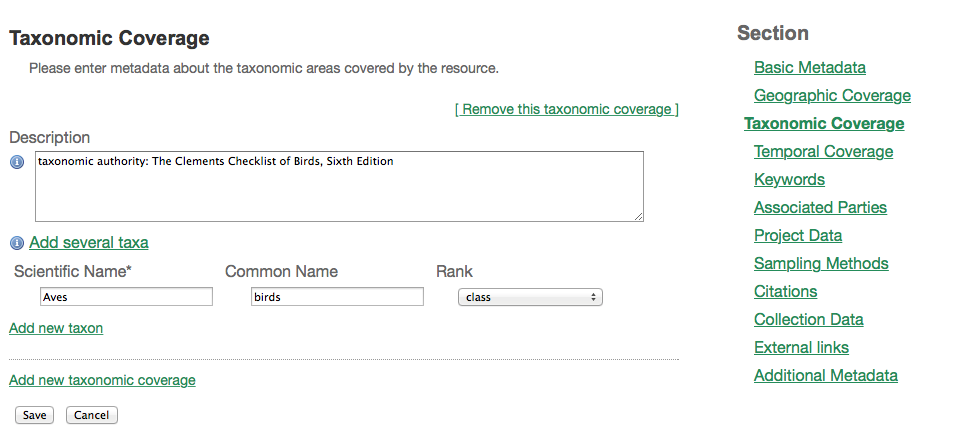
- Remove this taxonomic coverage - click on this link to remove the taxonomic coverage that follows immediately below the link, including the description, the list, and all single taxon entries.
- Description - a textual description of a range of taxa represented in the resource. Each taxonomic coverage has its own description. This information can be provided in place of, or to augment the information in the other fields on the page.
- Add several taxa - this link adds a text box labeled "Taxon List" to the page.
 * **Taxon List** - this text box allows the user to enter a list of taxa with each taxon on a separate line by using the ENTER key within the text box. The taxa entered in this list are treated as scientific names.
* **Add** - this button processes the values entered in the Taxon List text box and creates scientific names for each of them within the taxonomic coverage.
* **Add new taxon** - this link adds controls to enter a single taxon to the taxonomic coverage - text boxes for Scientific Name and Common Name, a select box for Rank and a trash icon. The taxon can contain any combination of scientific and common name with an optional rank.
* **Taxon List** - this text box allows the user to enter a list of taxa with each taxon on a separate line by using the ENTER key within the text box. The taxa entered in this list are treated as scientific names.
* **Add** - this button processes the values entered in the Taxon List text box and creates scientific names for each of them within the taxonomic coverage.
* **Add new taxon** - this link adds controls to enter a single taxon to the taxonomic coverage - text boxes for Scientific Name and Common Name, a select box for Rank and a trash icon. The taxon can contain any combination of scientific and common name with an optional rank.
 * **Scientific Name** - this text box is meant to contain the scientific name for the taxon.
* **Common Name** - this text box is meant to contain the scientific name for the taxon.
* **Rank** - this text box is meant to contain the taxonomic rank of the taxon.
* **Trash Icon** - clicking on this icon will remove the taxon (scientific name, common name, and rank) to the left of the icon from the taxonomic coverage.
* **Add new taxonomic coverage** - click on this link to initiate a form for a new taxonomic coverage with a text box labeled "Description" and links to "Add several taxa" and "Add new taxon" as described above.
* **Scientific Name** - this text box is meant to contain the scientific name for the taxon.
* **Common Name** - this text box is meant to contain the scientific name for the taxon.
* **Rank** - this text box is meant to contain the taxonomic rank of the taxon.
* **Trash Icon** - clicking on this icon will remove the taxon (scientific name, common name, and rank) to the left of the icon from the taxonomic coverage.
* **Add new taxonomic coverage** - click on this link to initiate a form for a new taxonomic coverage with a text box labeled "Description" and links to "Add several taxa" and "Add new taxon" as described above.
This metadata page contains information about one of more dates, date ranges, or named periods of time covered by the resource, each of which is called a temporal coverage. Coverages may refer to the times during which the collection or data set was assembled (Single Date, Date Range, and Formation Period), or to times during which the subjects of the data set or collection were alive (Living Time Period). Before the first temporal coverage for the resource is created, the page shows only a link labeled "Add new temporal coverage". Clicking on this link will show the default temporal coverage type "Single Date" in a select box, a text box labeled "Start Date", a calendar icon, and two links. Below is a screen image showing the default Temporal Coverage page before any data have been entered, followed by explanations of the controls seen on the page in this state.

- Add new temporal coverage - click on this link to initiate a form for an additional temporal coverage.
- Remove this temporal coverage - click on this link to remove the temporal coverage that follows immediately below the link.
-
Temporal Coverage Type - select one of the options in this select box to set the type of temporal coverage, which can consist of a single date, a date range, a formation period, or a living time period. Selecting a type will reveal controls appropriate to the choice as explained below.
-
Single Date - this is the default temporal coverage type showing when a temporal coverage is first created. This type is meant to represent a coverage spanning one day. Selecting this type reveals a text box for a Start Date, with a calendar icon to the right with which a date can be selected.
-
Start Date - this text box is meant to contain a single date in one of the supported date formats. To select a date, click on the calendar icon and choose a date, or enter the date manually. To find out what date formats are supported, open the information icon. Example: 2010-12-31 for 31 December 2010 in the New Era calendar.
-
Date Range - this temporal coverage is meant to describe the time period within which the objects in the collection were collected. Selecting this temporal coverage type reveals a text box for a Start Date and a text box for an End Date, each with a calendar icon to the right with which a date can be selected.
- Start Date - this text box is meant to contain the date the coverage began, in one of the supported date formats. To select a date, click on the calendar icon and choose a date, or enter the date manually. To find out what date formats are supported, open the information icon. Example: 2010-12-31 for 31 December 2010 in the New Era calendar.
-
End Date - this text box is meant to contain the date the coverage ended, in one of the supported date formats. To select a date, click on the calendar icon and choose a date, or enter the date manually. To find out what date formats are supported, open the information icon. Example: 2010-12-31 for 31 December 2010 in the New Era calendar.

-
Formation Period - this temporal coverage type is meant to accommodate a named or other time period during which a collection or data set was assembled. Examples: "Victorian", "1922-1932", "c. 1750".

-
Living Time Period - this temporal coverage type is meant to accommodate a named or other time period during which the biological entities in the collection or data set were alive, including paleontological time periods. Examples: "1900-1950", "Ming Dynasty", "Pleistocene".

-
Single Date - this is the default temporal coverage type showing when a temporal coverage is first created. This type is meant to represent a coverage spanning one day. Selecting this type reveals a text box for a Start Date, with a calendar icon to the right with which a date can be selected.
This metadata page allows the user to create one or more sets of keywords about the resource. Each set of keywords can be associated with a thesaurus/vocabulary that governs the terms in the list.

- Remove this keyword set - click on this link to remove the keyword set that follows immediately below the link.
- Thesaurus/Vocabulary - enter the name of a thesaurus or controlled vocabulary from which the keywords in the set are derived. If the keywords are not governed by a thesaurus/vocabulary, enter "n/a" indicating that it is not applicable in this text box. Example: IRIS keyword thesaurus.
- Keyword List - enter a list of keywords, separated by commas that describe or are related to the resource.
- Add new keyword set - click on this link to initiate a form for an additional keyword set.
This metadata pages contains information about one or more people or organisations associated with the resource in addition to those already covered on the Basic Metadata page. Many of the controls on this page are in common with those for the Resource Contacts on the Basic Metadata page. Explanations for the remainder of the controls are given below.

- Copy details from resource contact - if this person or organisation is the same as the first Resource Contact on the Basic Metadata page, all of the details can be copied into the equivalent fields for the associated party by clicking on this link.
- Remove this associated party - click on this link to remove the associated party that follows immediately below the link.
- Role - this select box contains a list of possible roles that the associated party might have in relation to the resource. Click on the information icon to the left of the select box to see descriptions of the possible roles. Choose the most appropriate role for the associated party in the select box.
- Add new associated party - click on this link to initiate a form for an additional associated party.
This metadata page contains information about a project under which the data in the resource were produced.

- Title - the title of the project.
- Identifier - a unique identifier for the research project. This can be used to link multiple dataset/EML document instances that are associated in some way with the same project, e.g. a monitoring series. The nature of the association can be described in the project description.
- Description - an abstract about the research project.
- Funding - information about project funding and its sources (grant titles and numbers, contract numbers, names and addresses, active period, etc.). Other funding-related information may also be included.
- Study Area Description - a description of the physical area where the project occurred (physical location, habitat, temporal coverage, etc.).
- Design Description - a description of the design and objectives of the project. It can include detailed accounts of goals, motivations, theory, hypotheses, strategy, statistical design, and actual work.
-
Project Personnel - the list of people involved in the project.
- Personnel First Name - the first name of the person associated with the project.
- Personnel Last Name - the last name of the person associated with the project.
- Personnel Directory - the URL of the personnel directory system to which the personnel identifier belongs. There are four default directories to choose from: ORCID, ResearchID, LinkedIn, and Google Scholar. If you'd like to change the IPT's default set of directories, refer to the How To Add a New User ID Directory page in the IPT wiki.
- Personnel Identifier - a 16-digit ORCID ID (e.g. 0000-0002-1825-0097) or another identifier that links this person to the personnel directory specified.
- Personnel Role - the role of the person associated with the project. Click on the information icon to the left of the select box to see descriptions of the possible roles. Choose the most appropriate role in the select box for the person named above.
This metadata page contains information about sampling methods used for the data represented by the resource.

- Study Extent - a description of the physical and temporal conditions under which the sampling occurred. The geographic study extent is usually a surrogate (representative area of) for the larger area documented in the "Study Area Description" field of the Project metadata page.
- Sampling Description - a text-based/human readable description of the sampling procedures used in the research project. The content of this element would be similar to a description of sampling procedures found in the methods section of a journal article.
- Quality Control - a description of actions taken to either control or assess the quality of data resulting from the associated method step(s).
- Step Description - A method step is one in a series of repeated sets of elements that document a series of methods and procedures used in the study, and the processing steps leading to the production of the data files. These include text descriptions of the procedures, relevant literature, software, instrumentation, source data and any quality control measures taken. Each method should be described in enough detail to allow other researchers to interpret and repeat, if required, the study.
- Add new method step - click on this link to add a text box labeled "Step Description" to the page (see above). One may add as many method steps as desired.
- Remove this method step - click on this link to remove the method step text box that follows immediately below the link.
This metadata page contains information about how to cite the resource as well as a bibliography of citations related to the data set, such as publications that were used in or resulted from the production of the data. Each Citation, whether for the resource or in the bibliography, consists of an optional unique Citation Identifier allowing the citation to be found among digital sources and a traditional textual citation. Before any Citation data are entered, the page will show a text box for the Citation Identifier for the resource, a text box for the Resource Citation, a heading labeled "Bibliographic Citations", and a link labeled "Add new bibliographic citation".

-
Resource Citation - the single citation for use when citing the dataset.
- Example citation with institutional creator: Biodiversity Institute of Ontario (2011) Migratory birds of Ontario. Version 1.2. University of Guelph. Dataset/Species occurrences. http://dx.doi.org/10.5886/qzxxd2pa
- Example citation with 9 creators: Brouillet L, Desmet P, Coursol F, Meades SJ, Favreau M, Anions M, Belisle P, Gendreau C, Shorthouse D (2010) Database of vascular plants of Canada. Version 1.2. Universite de Montreal Biodiversity Centre. Dataset/Species checklist. http://doi.org/10.5886/1bft7W5f
- Auto-generation - Turn On/Off - turn on to let the IPT auto-generate the resource citation for you. The citation format used in auto-generation is based on DataCite's preferred citation format, and satisfies the Joint Declaration of Data Citation Principles. This format includes a version number, which is especially important for datasets that are continuously updated. You can read more about the citation format in the IPT Citation Format page in the IPT wiki.
- Citation Identifier - a DOI, URI, or other persistent identifier that resolves to the online dataset. It is recommended the identifier be included in the citation. If the resource has been assigned a DOI (using the IPT), the IPT sets the DOI as the citation identifier and it can no longer be edited.
- Bibliographic Citations - the additional citations of other resources related to or used in the creation of this resource.
-
Add new bibliographic citation - click on this link to add the text boxes required for an additional citation in the bibliography.
- Bibliographic Citation - the citation of an external resource related to or used in the creation of this resource.
-
Bibliographic Citation Identifier - a DOI, URI, or other persistent identifier that resolves to the online external resource. It should be used in the citation, usually at the end.

- Remove this bibliographic citation - click on this link to remove the citation that follows immediately below the link.
This metadata page contains information about the physical natural history collection associated with the resource (if any) as well as lists of types objects in the collection, called Curatorial Units, and summary information about them. Before any Collection data are entered, the page will show a header for each section (Collections, Specimen preservation methods, Curatorial Units) and a link labeled "Add new curatorial unit".

-
Collections - the list of collections that this resource is based on.
- Add new citation - click on this link to add the text boxes required for an additional collection in the Collections section.
- Collection Name - the full standard name by which the collection is known or cited in the local language.
- Collection Identifier - The URI (LSID or URL) of the collection. In RDF, used as URI of the collection resource.
- Parent Collection Identifier - Identifier for the parent collection for this sub-collection. Enables a hierarchy of collections and sub collections to be built. Please enter "Not applicable" if this collection does not have a parent collection.
-
Remove this collection - click on this link to remove the collection that follows immediately below the link.

-
Specimen Preservation Methods - the list of specimen preservation methods covered by the resource, indicating the process or technique used to prevent physical deterioration of non-living collections. The values to choose from are based on the GBIF Specimen Preservation Method vocabulary. Remember you can include a list of preparations and preservation methods for a specimen in your data mapping DwC term preparations (http://rs.tdwg.org/dwc/terms/preparations). Please don't select anything for treatments for living collections. This can relate to the curatorial unit(s) in the collection.
- Add new preservation method - click on this link to add the text boxes required for an additional preservation method in the Specimen Preservation Methods section.
-
Remove this preservation method - click on this link to remove the preservation method that follows immediately below the link.

-
Curatorial Units - the counts of curatorial units covered by the resource. The count can be entered as a range or as a value with an uncertainty. Examples of units include skins, sheets, pins, boxes, and jars. Overall, this section summarizes the physical contents of the collection by type.
- Add new curatorial unit - click on this link to add the select text boxes required for an additional curatorial unit in the Curatorial Units section. When a new curatorial unit is added, the default Method Type selection is "Count Range".
-
Method Type - this select box allows the user to choose from among two methods to specify the number of objects of a given type, either a count range, or a count with uncertainty. After making the selection, appropriate text boxes will appear allowing that counting method to the represented.
-
Count Range - this method type allows the user to set the lower and upper bounds on the number of objects of a particular unit type. See screen image above.
- Between - enter the lower bound of the number of objects in this text box.
- and - enter the upper bound of the number of objects in this text box.
-
Count with uncertainty - this method allows the user to set a number of objects of a particular unit type with an uncertainty above or below that number.
- Count - enter the mean likely number of object in this text box.
- +/- - enter the number of objects more or less than the number in the count text box for the range of possible counts of the particular unit type
- Unit Type - the single type of object (specimen, lot, tray, box, jar, etc.) represented by the method type and count.
-
Count Range - this method type allows the user to set the lower and upper bounds on the number of objects of a particular unit type. See screen image above.
-
Remove this curatorial unit - click on this link to remove the curatorial unit that follows immediately below the link.

This metadata page contains links to the home page for the resource as well as links to the resource in alternate forms (database files, spreadsheets, linked data, etc.) and the information about them. Before any external links are entered, the page will show a text box for the Resource Homepage and a link labeled "Add new external link".

- Resource Homepage - enter the full current URL of the web page containing information about the resource or its data set.
-
Other Data Formats - links to your resource data in other formats (e.g., database dumps, spreadsheets, nexus, linked data, etc.).
- Add new external link - click on the link having this text to add the text boxes required for an additional external link.
- Name - the name of the file or data set.
- Character Set - the name or code for the character encoding (e.g., ASCII, UTF-8).
- Download URL - the URL from which the file for the document or data set can be downloaded in the mentioned format.
- Data Format - the name or code of the document or file format (e.g., CSV, TXT, XLS, Microsoft Excel, MySQL).
- Data Format Version - the version of the document or file format given in the Data Format text box (e.g., 2003, 5.2).
- Remove this external link - click on the link having this label to remove the external link that follows immediately below.
This metadata page contains information about other aspects of the resource not captured on one of the other metadata pages, including alternative identifiers for the resource. Before any alternative identifiers are entered, the page will show text boxes for the purpose, maintenance description, additional metadata, a header for the Alternative Identifiers area, and a link labeled "Add new alternative identifier".

- Date Created - the date on which the first version of the resource was published. It will be used to formulate the publication year in the auto-generated resource citation. This value is set automatically when publishing and cannot be edited.
- Date Published - the date when the resource was last published. This value is set automatically when publishing (see the Published Versions section).
- Resource logo URL - a logo representing the resource. The logo URL can be used to upload the resource. It may also be uploaded from an image file selected from your disk.
- Purpose - a summary of the intentions for which the data set was developed. Includes objectives for creating the data set and what the data set is to support.
- Maintenance Description - a description of the maintenance frequency of this resource. This description compliments the update frequency selected on the Basic Metadata page.
- Additional Information - any information that is not characterised by the other resource metadata fields, e.g. history of the project, publications that have used the current data, information on related data published elsewhere, etc.
-
Alternative Identifiers - this section contains a list of additional or alternative identifiers for the resource. When the resource is published, the IPT's URL to the resource is added to the list of identifiers. When a resource is assigned a new DOI (using the IPT), the IPT ensures this DOI is placed first in the list of identifiers. When a resource is registered with the GBIF Registry, the Registry's unique resource key is also added to the list of identifiers. If the resource represents an existing registered resource in the GBIF Registry, the existing registered resource UUID can be added to the list of identifiers. This will enable the IPT resource to update the existing resource during registration, instead of registering a brand new resource. For more information on how to migrate a resource, see this section.
- Add new alternative identifier - click on this link to add a text box for an alternative identifier for the resource.
- Alternative Identifier - the text for the alternative identifier for the resource (e.g., a URL, UUID, or any other unique key value).
- Remove this alternative identifier - click on this link to remove the alternative identifier that follows immediately below.
This area of the Resource Overview page allows a user to publish a version of the resource.

The left-hand section controls how resource versions are published. The publish button can be used to publish new versions on demand, or auto-publishing can be enabled to publish new versions on a schedule. For explanations of the options in this section, refer to the information below.

- Publish on demand: - simply click on the button labeled "Publish" to trigger publishing a new version. The button labeled "Publish" will be enabled if 1) the required metadata for the resource are complete, and 2) the user has the role "Manager with/without registration rights". When the resource is registered or the resource has been assigned a DOI, however, only users with the role "Manager with registration rights" can publish, since the resource's registration gets updated during each publication (see the explanation for Role in the "Create a new user" section under the "Configure User accounts" heading of the "Administration Menu" section). After pressing the "Publish" button, a confirmation dialog will appear. The dialog varies depending on whether the pending version is a major version change or minor version change:


The resource manager should enter a summary of what changes have been made to the resource (metadata or data) since the last/current version was published. The change summary is stored as part of the resource version history, and can be edited by resource managers via the resource homepage. A complete description of what happens after pressing "Publish" is explained in the "Publishing steps" section below.
- Auto-publishing: - to turn on automated publishing, select one of the 5 publishing intervals (annually, biannually, monthly, weekly, or daily) and then press the publish button. When automated publishing is on, the publishing interval and next published date are clearly displayed in the published versions section. To change the publishing interval, select a different publishing interval and press publish. To turn off automated publishing, select "Turn off" and then press publish. In case of failure, publishing will be retried automatically up to 3 more times. This safeguards against infinite publishing loops. Resources configured to publish automatically, but that failed to finish successfully will have a next publication date in the past, and will be highlighted in the public and manage resource tables.
The right-hand section contains a table that compares the current version against the pending version. Resource managers can use this table to manage resource versioning, preview the pending version, plus review and validate the current version. For explanations of the rows of information in the table, refer to the information below.
Table 1 (below): demonstrates a major version change since the pending version has been reserved a new DOI:

Table 2 (below): demonstrates a minor version change since the DOI assigned to the current and pending versions is the same:

-
Version: - the version number tracking the major_version.minor_version of the current/pending version. Each time the resource undergoes scientifically significant changes, the resource manager should ensure the pending version has a new major version, done by reserving it a new DOI. A detailed description of the IPT's versioning policy is explained here. In the current version column, click the "View" button to see the current version's homepage. Assuming a DwC-A has been published, click
 the to validate it using the Darwin Core Archive Validator. In the pending version column, click the "Preview" button to see a preview of the pending version's homepage. The homepage preview is private to resource managers only, and enables them to make sure the resource is ready to publish.
 - Visibility: - the visibility of the current/pending version. In order to register the resource with GBIF, the resource manager must ensure the current version is public. In order to assign a DOI to a resource, the resource manager must ensure the pending version is public.
- DOI: - to DOI of the current/pending version. The DOI of the current version can never be changed, however, the DOI of the pending version can be reserved or deleted. For explanations of how DOIs are reserved, deleted, registered, deactivated, reactivated please see the DOI section below.
- Data License: - the license applied to the resource. In order to register the resource with GBIF, the resource manager must ensure a license equivalent to either CC0, CC-BY, or CC-BY-NC is applied to the resource. GBIF's licensing policy is described here.
- Published on: - to date the current version was published on / the date the pending version will be published on.
- Publication log: - click the download button to retrieve the "publication.log" of the current version. The resource manager can use the publication log to diagnose why publication failed for example. A more detailed description of its contents is described below in the Publishing Status page section. This is not applicable to the pending version.
- Publication report: - the publication summary of the current version - not applicable to the pending version.
The publish action consists of the steps described below. Publication is all or nothing meaning that each step must terminate successfully in order for a new version to be published. If any step fails, or if the publish action is cancelled, the version is rolled back to the last published version.
- The current metadata are written to the file eml.xml. An incremental version named eml-n.xml (where n is the incremental version number reflecting the publication version) is always saved.
- A data publication document in Rich Text Format (RTF) is written to the file shortname.rtf. An incremental version of the RTF file named shortname-n.rtf is always saved.
- The current primary resource data as configured through mapping are written to the Darwin Core Archive file named dwca.zip. The data files in the Darwin Core Archive are then validated (see "Data Validation" section below).
- If the IPT's Archival Mode is turned on (see Configure IPT settings section, an incremental version of the Darwin Core Archive file named dwca-n.zip is also saved.
- The information about the resource is updated in the GBIF Registry if the resource is registered.
- The DOI metadata about the resource is updated and propagated to DOI resolvers if the resource is assigned a DOI using the IPT.
The IPT writes data files inside the DWCA as tab delimited files void of line breaking characters (note: line breaking characters found in the original data are replaced with an empty string).
After writing, the IPT also validates their content in the following ways:
- If a column representing the core record identifier (e.g. occurrenceID is the core record identifier of the Occurrence core) is found in the core data file, the IPT will validate that for each record, the core record identifier is present, and unique.
- The Darwin Core term basisOfRecord is a required term in the Occurrence extension. Therefore the IPT validates that each Occurrence data file has a basisOfRecord column. In addition, the IPT validates that for each Occurrence record the basisOfRecord is present, and its value matches the Darwin Core Type vocabulary.
Best practice is to assign a new DOI to the resource every time it undergoes a scientifically significant change. To enable the IPT to assign DOIs to resources, the IPT administrator must first configure an organisation associated to the IPT with a DataCite account. Refer to the "Configure Organisations" section for help doing this. Otherwise the DOI buttons in the Published Versions sections are hidden from view. Once a DataCite account has been activated in the IPT, resource managers can reserve, delete, register, deactivate, and reactivate DOIs for their resources using this account. Each of these DOI operations is explained in detail below. For more help understanding how the IPT assigns DOIs to datasets, refer to the IPT DOI Workflows page in the IPT wiki.
-
Reserve: - a DOI can be reserved for a resource. This operation varies a little depending on whether the resource has already been assigned a DOI or not.
- Resource not assigned a DOI: - a DOI can be reserved for a resource after the mandatory metadata has been entered. To reserve a DOI, press the "Reserve" button in the Published Versions section. To reuse an existing DOI, enter it into the citation identifier field in the resource metadata, and then press the "Reserve" button in the Published Versions section. If a resource is publicly available and reserved a DOI, the next publication will result in a new major version and the DOI will be registered. Otherwise if a resource is private and reserved a DOI, the next publication will result in a new minor version of the resource and the DOI will NOT be registered. Be aware that until a DOI is registered it can still be deleted.
- Resource assigned a DOI: - another DOI can be reserved for a published resource that has already been assigned a DOI. To reserve another DOI, press the "Reserve new" button in the Published Versions section. The DOI will be registered the next time the resource is published, and will resolve to the newly published version's homepage. The former DOI will still resolve to the previous version, but will display a warning the new one superseded it. Be aware that until a DOI is registered it can still be deleted.
- Delete: - a DOI that is reserved for the resource can be deleted since it was never publicly resolvable. To delete a DOI, press the "Delete" button in the Published Versions section.
- Register: - if a resource is publicly available and reserved a DOI, the next publication will result in a new major version and the DOI will be registered.
- Deactivate: - a DOI that has been registered cannot be deleted, and must continue to resolve. The only way to deactivate a DOI is by deleting the resource itself. Deleting the resource will ensure the data can no longer be downloaded, and the DOI will resolve to a page explaining the resource has been retracted. Be aware that it can take up to 24 hours until a DOI update is globally known.
- Reactivate: - a DOI that has been deactivated resolves to a resource that has been deleted. To reactivate the DOI, the resource must be undeleted. Undeleting a resource makes the data available for download again, and the DOI will resolve to the last published version of this resource. Be aware that it can take up to 24 hours until a DOI update is globally known.
A page entitled Publishing Status will show status messages highlighting the success or failure of each publishing step. Publication of a new version is an all or nothing event, meaning that all steps must finish successfully otherwise the version is rolled back.
- Resource overview - This link leads to the Manage Resource page for the resource just published.
-
Publication log - This link initiates a download of a file named "publication.log", which contains the detailed output of the publication process. This file contains specific information to help managers identify problems during publication such as:
- how many records couldn't be read and were not written to the DwC-A
- how many records were missing an identifier, or how many had duplicate identifiers (in the case that the core record identifier field was mapped)
- how many records contained fewer columns than the number that was mapped
- Log message - The Publishing Status page shows a summary of the information that was sent to the filed named publication.log, which is stored in the directory for the resource within the IPT's data directory and which is accessible through the link to the "Publication Log" immediately above the log message summary.

The Visibility area of the Manage Resources page allows users having manager rights for the resource to change its visibility state. The visibility of a resource determines who will be able to view it, and whether the resource can be assigned a DOI or registered with GBIF. By default, each resource is visible only to the user who created it and any other users who have the Admin role on the IPT where the resource is created. For explanations of each visibility state refer to the information below.
-
Private - A private resource is visible only to those who created it, or those who have been granted permission to manage it within the IPT, or by a user having the Admin role. This is primarily meant to preserve the resource from public visibility until it has been completely and properly configured. Be aware a DOI can be reserved for a private resource, but that DOI cannot be registered until the resource is publicly visible. When the resource is ready for public visibility, click on the button labeled "Public". A message will appear at the top of the page saying that the status has been changed to "Public".

-
Public - A public resource is visible to anyone using the IPT instance where the resource is installed (on the table of public resource on the IPT Home page). If the resource has a reserved DOI, that DOI will be registered the next time the resource is published. The resource is ultimately accessible via the Internet to anyone who knows its homepage URL or DOI. However, the resource is not globally discoverable through the GBIF website until it has been registered with the GBIF Registry. Be aware the visibility of a resource assigned a DOI cannot be changed to private.
 Two buttons appear in the left-hand section of the visibility area. Clicking on the button labeled "Private" will remove the resource entirely from public visibility and return it to the private state. The button labeled "Register" will only be enabled if 1) the required metadata for the resource are complete, 2) the resource has been published (see the explanation of the Published Versions area of the Resource Overview page, below), and 3) the user has the role "Manager with registration rights" (see the explanation for Role in the "Create a new user" section under the "Configure User accounts" heading of the "Administration Menu" section). A user having the Admin role can grant the "Manager with registration rights" to any user.
 Finally, click on the button labeled "Register" to register the resource with the GBIF Registry. (Note: If you want this resource to update an existing registered DiGIR, BioCASE, or TAPIR resource, please refer to the section Migrate a Resource below) Clicking on this button will open a dialog box with which to confirm that you have read and understood the GBIF data sharing agreement, to which a link is given. Click on the check box to indicate that you agree with these terms. Doing so will cause a button labeled "Yes" to appear at the bottom of the dialog box. Click on "Yes" to register the resource, or click on "No" to defer the decision and close the dialog box.
 If the attempt to register is successful, a message will appear at the top of the page saying that the status has been changed to "Registered".
 -
Registered - A resource that has been registered with the GBIF network is discoverable through the GBIF website and the data from the resource can be indexed by and accessed from the GBIF portal. Be aware it can take up to one hour for data to be indexed by GBIF following registration. A summary of information registered with GBIF will appear in the right-hand column when registration is complete.
 If the resource has already been registered, every time the "Publish" button is clicked, its registration information in the GBIF Registry also gets updated. The visibility of a registered resource can not be changed to private. If a resource must be removed from the GBIF Registry, follow the procedure described in the "Delete a Resource" section under the "Resource Overview" heading in the "Manage Resources Menu" section.
There is now a way to migrate existing registered DiGIR, BioCASE, TAPIR, or DwC-A resources to an IPT. This allows the existing resource to preserve its GBIF Registry UUID.
The way this works, is that the IPT resource is configured to update the existing registered resource that it corresponds to in the GBIF Registry.
To migrate an existing registered resource to your IPT resource, simply follow these instructions:
- Ensure that the IPT resource's visibility is public and NOT registered.
- Determine the owning organisation of the existing registered resource, and ensure that it is added to the IPT as an organisation, and that it is configured to publish datasets. To do so, please refer to the section "Add Organisation".
- Select the owning organisation from the drop-down list on the Basic Metadata page. Don't forget to save the Basic Metadata page.
- Go to the GBIF Dataset page of the existing registered resource. Depending on whether you are running the IPT in test or production mode, you would visit http://www.gbif-uat.org/dataset or http://www.gbif.org/dataset respectively.
- Ensure GBIF Dataset page shows the correct owning organisation of the existing registered resource. Warning: if it shows a different owning organisation, the GBIF Registry must be updated before you can proceed with the remaining steps. Send an email to [email protected] alerting them to the update needed.
- Copy the GBIF Registry UUID from the GBIF Dataset page URL, e.g "5d637678-cb64-4863-a12b-78b4e1a56628".
- Add this UUID to the list of the IPT resource's alternative identifiers on the Additional Metadata page. Don't forget to save the Additional Metadata page.
- Ensure that no other public or registered resource in your IPT includes this UUID in their list of alternative identifiers. In cases where you are trying to replace a registered resource that already exists in your IPT, the other resource has to be deleted first.
- On the resource overview page, click the register button. Similar to any other registration, you will have to confirm that you have read and understood the GBIF data sharing agreement before the registration will be executed.
- Send an email to [email protected] alerting them about the update. In your email please enclose:
- the name and URL (or GBIF Registry UUID) of your IPT
- the name and GBIF Registry UUID of your updated Resource (see line Resource Key on resource overview page, for example: Resource Key d990532f-6783-4871-b2d3-cae3d0cb872b)
- (if applicable) whether the DiGIR/BioCASE/TAPIR technical installation that used to serve the resource has been deprecated, and whether it can be deleted from the GBIF Registry
 Each resource has one or more explicitly assigned managers who are allowed to view, change, and remove the resource. The user who creates a resource automatically has these capabilities. Additional managers can be associated with a resource and given these same capabilities by selecting them by name from the select box in this area of the Resource Overview page, then clicking on the button labeled "Add". Any manager associated with a resource and having the role "Manager with registration rights" may also register the resource and update it in the GBIF registry. All users having the Admin role automatically have complete managerial roles for all resources in the IPT instance. The right-hand column of this area shows the name and email address of the creator of the resource. If any managers have been added, their names and email addresses will be listed under the creator. Any added manager can have the managerial role for the resource removed by clicking on the button labeled "Delete" to the right of the email address in the manager listing.

Clicking on the button labeled "Delete" on the Resource Overview page will remove the resource from the IPT and all of the related documents from the file system. If you intend to remove a resource that has been registered with GBIF, you should also inform the GBIF Help Desk ([email protected]) that you would like it to be unregistered. If you want to preserve the resource information but remove the resource from the IPT, make a copy of the folder for the resource to a safe location outside of the IPT directory structure. The name of the folder for the resource is the same as the resource Shortname, and can be found under the folder named "resources" in the IPT data directory. A resource saved in this way can be re-integrated into the IPT, or integrated with a distinct IPT instance by following the procedure described in the "Integrate an existing resource configuration folder" section under the "Create a New Resource" heading in the "Manage Resources Menu" section.
This section describes each of the functions that are accessible from the Administration menu. Clicking on the Administration menu opens a page (see screen image, below) from which each of these specific administrative tasks can be accessed by clicking on the appropriate button. Note that the button labeled "Organisations" will remain disabled by default until the GBIF registration options have been set.
This page allows a user having the Admin role to make and change settings for the characteristics of this IPT instance.

- Base URL - This is the URL that points to the root of this IPT installation. The URL is set automatically during the installation of the IPT. The Base URL must be accessible via the Internet in order for the IPT to function fully. Configuring the IPT Base URL to use localhost, for example, will not allow the instance of the IPT to be registered with GBIF, will not allow the IPT to be associated with an organisation and will not allow the resources to be publicly accessible.
-
Note: The IPT tests the Base URL for accessibility from the client computer when the IPT Settings are saved. If the IPT is not accessible at the given Base URL, the IPT will display a warning message and the changes will not be saved. The procedure to change the Base URL if the new URL is not yet functional (such as a port change that requires the IPT to be restarted) is given below:
- log out of and shut down the IPT.
- in the data directory for the IPT, open the file config/ipt.properties with a simple text editor - one that does not add extra codes, such as NotePad, TextEdit, vi, etc. (not Microsoft Word).
- in the ipt.properties file, change the line starting with "ipt.baseURL" to the new URL with the new port, using the backslash to escape the colon character. For example, enter
ipt.baseURL=http://test.edu:7001/iptfor http://test.edu:7001/ipt. - restart the IPT in the servlet container.
- update the metadata for the IPT as described in the next section of this user manual entitled "Publish all resources".
- Proxy URL - If the server on which the IPT is installed is routed through a proxy server or virtual host, enter the proxy as a URL in the format protocol:host:port, for example http://proxy.gbif.org:8080.
- Google Analytics key - If you would like to track the use of your instance of the IPT with Google Analytics, you can enable it to do so by entering your Google Analytics key in this text box. This is distinct from enabling GBIF to track the use of this instance of the IPT, which can be enabled using the check box described below. For more information about Google Analytics, see http://www.google.com/intl/en/analytics/index.html.
- Enable GBIF Analytics - Check this box if you would like to enable GBIF to track this instance of the IPT with Google Analytics.
- Debugging Mode - Check this box if you would like the IPT to begin logging in the verbose debugging mode. Debugging mode is generally unnecessary unless you are trying to track a problem with the IPT. The IPT log file is located in the file debug.log in the IPT's data directory. The data directory is set during the first step in the installation process (see the Getting Started Guide). Refer to the information under the "View IPT logs" heading of the "Administration Menus" section for an easy way for users having the Admin role to view the debug.log file.
- Archival Mode - Check this box if you want your IPT to archive all published versions for all resources. It will enable you to track a resource's version history. If unchecked, older versions will be overwritten with the latest. Beware not to run out of disk space.
- IPT Server Location - This area of the page allows the Admin to set the geographic coordinates (latitude and longitude) of the location of the server on which the IPT is installed. Setting these coordinates allows GBIF to map the location of this among other registered IPT installations around the world.
This option is an administrative action just like the Publish button, only it publishes ALL resources. Therefore for each resource, it creates a new DWCA, EML, and RTF, and broadcasts the update to the Registry and via RSS. In addition, it also updates the IPTs metadata in the Registry. If any of the following conditions have been met since the last time the resources were updated, click on this button to make the necessary updates:
- Multiple resources have been updated, and you want to publish a new release for all of them instead of publishing them individually.
- The Base URL or Proxy URL has been changed and you want to update the IPTs registered services to reflect the change.
This page allows users having the Admin role to create, modify, and delete user accounts. When the page is opened, it shows a table of existing users and basic information about them including their names, email addresses, roles, and the date and time of their last logins.
 #### Create a new user
A new user can be created by clicking on the button labeled "Create" below the list of existing users. This will open a page on which the information about the user can be entered, after which the new user can be created by clicking on the button labeled "Save".
#### Create a new user
A new user can be created by clicking on the button labeled "Create" below the list of existing users. This will open a page on which the information about the user can be entered, after which the new user can be created by clicking on the button labeled "Save".
- Email - The current email address of the user is used as an identifier to log in within the IPT and can not be changed.
- Note: If the user requires a change of email address, the recommended procedure is to create a new user account with the new email address, then delete the user account having the antiquated email address.
- First name - The first name of the user.
- Last name - The last name of the user.
- Role - The role the user will have with respect to this installation of the IPT. Admin users can make changes to all aspects of the instance of the IPT. Users having the role "Manager without registration rights" are able to create, edit, remove, and manage resources they have created or have been invited to manage within the IPT instance. Users having the role "Manager with registration rights" have the additional capability to register resources with the GBIF network. Other users can log in to the IPT and view resources, but cannot make any changes.
- Password - The password for the user must consist of at least four characters and should be made secure and safe from loss, as it is not recoverable from the IPT application.
- Note: If a user's password is lost, it can be reset to an automatically generated new value by a user having the Admin role. It is the responsibility of the Admin user to communicate this new password to the user for whom it was reset. The user can then change the password to the desired value by entering it in the IPT Account page accessible through the "Account" link in the header in the upper right corner of every page after logging in.
- Verify password - An exact copy of the password as entered in the Password text box to confirm that it was entered as intended.
Information about users can be changed in the user details page after selecting the name of the user you wish to modify from the list of existing users. The user detail page shows all of the information about that user. The first name, last name, and role for the user can be changed by entering the new values and clicking on the button labeled "Save". Details of the information to be entered on this page can be found in the explanations in the "Create a new user" section, above.

- Reset password - If a user forgets a password, clicking on the button labeled "Reset Password" can generate a new one, after which a new password is given in an information message at the top of the page.
- Note: The IPT does not inform the affected user of this change, so it is the responsibility of the Admin who resets the password to inform the user of the new one.
Users accounts that are no longer necessary can be deleted using the user detail page accessed by selecting the name of the user you wish to delete from the list of existing users. On the bottom of the user detail page, click on the button labeled "Delete" to remove this user account. There are several conditions under which a user cannot be deleted. A user cannot delete an account while logged in to that account. It must be deleted from another account having the Admin role. Also, the IPT installation must always have at least one user having the Admin role, so the last remaining Admin can not be deleted. To remove that user, first create a new user having the Admin role and log in with that new user to delete the other Admin account. Finally, each resource must have at least one associated user having either the Admin or one of the Manager roles, so the last remaining Manager of a resource can not be deleted. To remove that user, first associate another user having the Admin or one of the Manager roles with any resources for which the user you wish to delete is the last remaining manager. Refer to the information under "Resource Managers" in the "Edit an existing resource" section above to see how new managers can be assigned.
This page allows a user to register the IPT instance in the GBIF Registry if this has not already been done. The IPT must be registered before any of the IPTs resources can be associated with an organisation (see the information under the "Configure Organisations" heading in the "Administration Menu" section) or published (see the Published Versions section). Information about a registered IPT and its public resources become searchable through the Registry's services, and the data from the public resources published on the IPT can be indexed for searching via the GBIF portal. If the IPT has already been registered, the registered information for the IPT can be edited opening the "Edit GBIF registration" page.
The first step to register with GBIF is to test that the IPT has a valid URL that can be reached by the GBIF services. To run this test, click on the button labeled "Validate".
If the validation test is unsuccessful, an error message will suggest the nature of the problem with the communication between the GBIF Registry and the IPT. Causes for an error include:
- No Internet connectivity - The IPT requires an active Internet connection to function properly. An error will occur if connectivity to the Internet is lost when the button labeled "Validate" button is clicked. Restore Internet connectivity before trying to proceed with registration.
- Incorrect Base or Proxy URL - The Base URL is automatically detected and configured during the IPT setup process (see the "IPT Setup II" section). Changes in the configuration of the server on which the IPT is installed could require a change in the Base URL or the Proxy URL. The Base and Proxy URLs can be changed on the Configure IPT Settings page (see the explanations for Base URL and Proxy URL in the Configure IPT settings section).
- Firewall - If the Internet connection is live, a firewall may be preventing connections to the Base URL or Proxy. Change the firewall or proxy settings to all outside connections.
- GBIF Registry inaccessible - If an error message suggests that none of the previous errors has occurred and yet there is a failure to communicate with the GBIF Registry, please report that there are problems connecting to the GBIF registry to the GBIF help desk ([email protected]).

If the IPT passes the validation step above, a form showing additional information required for registration is presented. In this step, the IPT instance is associated to an organization. The organization must already be registered in the GBIF Registry, and its password must be known. For explanations of the fields and selections on this form, refer to the information below.

Following are explanations of the specific information to select or enter:
- Organisation - the select box contains a list of organisations in the GBIF registry. Select the single organisation with which this IPT instance will be associated. If you are unable to find the organisation you seek on the list, use the GBIF Registry (http://www.gbif.org/publisher/search) to determine if the organisation is registered under a name other than what you expected. If the organisation is not yet registered with GBIF, please contact the GBIF Help Desk to register the organisation before proceeding with the registration of the IPT. Click on the help icon and then click on the helpful GBIF Help Desk link to open up an email template in your default mail client that you just have to fill in the required information before sending.
- Organisation's password - the correct password registered in the GBIF registry for the selected organisation must be entered in this text box to verify that the user has the authorisation required to associate the IPT instance with that organisation. If you do not have to the organisation's password, you can request it from the registered contact. A link to the primary contact on record for the organisation will appear below the Organisation's Password text box after selecting an organisation in the Organisation select box. The password will be used to authenticate the IPT registration when the button labeled "Save" is clicked.
- Alias - enter a convenient name or code to represent the organisation within this instance of the IPT. The alias will appear in place of the full organisation name in organisation select boxes in the IPT user interfaces.
- Can publish resources? - check this box if the selected organisation can also be associated with resources published on this instance of the IPT. If left unchecked, the organisation will not appear in the list of organisations available to associate with a resource. Leave unchecked only if this organisation is only the host for the IPT instance, not for any of the resources published through the IPT instance.
- Title for the IPT installation - enter the title of the IPT installation to be used in the GBIF Registry. The title is the primary information used for listing and searching for the IPT installations in the Registry.
- Description for this IPT installation - enter the description of the IPT installation to be used in the GBIF Registry. The description is meant to help users of the Registry to further understand the significance of the IPT instance by allowing further information beyond the specific metadata fields to be shared.
- Contact Name - enter the name of the person who should be contacted for information about the IPT installation. This person should be someone who has an Admin role in the IPT instance and knows the technical details about the installation.
- Contact Email - enter the current email address of the person whose name is given in the Contact Name.
- IPT password - enter the password that should be used to edit the entry for this IPT installation in the GBIF Registry.
- Save - when all of the information above is entered or selected, click on the button labeled "Save" to register the IPT installation with the GBIF Registry. After successfully registering the IPT installation, the Configure GBIF registration page will show that the IPT has already been registered and associated with the selected organisation. Also, after a successful registration, the Configure Organisations page will become accessible from the Administration menu.
- Note: Any changes to the IPT registration (rather than resource registration - for which see the "Visibility" section under the "Resource Overview" heading in the "Manage Resources Menu" section as well as the information under the "Publish all resources" heading in the "Administration Menu" section) will have to be done in consultation with the GBIF Help Desk ([email protected]).
This page allows a user to edit the title, description, contact name, and contact email of the IPT instance once it has been registered in the GBIF Registry. Changing the associated (host) organisation is not possible. For help changing other fields displayed in the GBIF Registry, the administrator can contact the GBIF Help Desk ([email protected]).

This page is unavailable until the IPT instance has been successfully registered in the GBIF Registry (see the information under the "Configure GBIF registration" heading of the "Administration Menu" section). Once registered, this page shows a list of organisations that can be associated with resources in this IPT instance. An IPT that hosts data for organisations other than the one to which it is associated must have the additional organisations configured before they can be used.
An IPT capable of assigning DOIs to resources must also have an organisation configured with a DataCite account. To be configured with a DataCite account, the organisation does not necessary have to be able to publish resources (be associated with resources). Only one DataCite account can be used to register DOIs at a time, and the IPT's archival mode must also be turned on (please refer to the Configure IPT settings section to learn more about the archival mode). The list of organisations shows which organisations have been configured with DataCite accounts, and which one has been selected to register DOIs for all resources in this IPT instance.

On this page a user having the Admin role can edit the organisation. Click on the button labeled "Edit" to open the page containing the details of the selected organisation. For explanations of the fields and selections on this form, refer to the information below.

Following are explanations of the specific information to select or enter:
- Organisation name - the title of the organisation as registered in the GBIF Registry. Note: this cannot be changed.
- Organisation password - the password that should be used to edit the entry for this organisation in the GBIF Registry.
- Organisation alias - a name given to the organisation for convenience within the IPT instance; aliases, rather then the full Organisation Name appear in Organisation selection lists in the IPT.
- Can publish resources - this checkbox indicates whether the organisation can be associated with resources in the IPT. Only those organisations having this box checked will appear in lists to be associated with resources.
- DOI registration agency - the type of account used to register DOIs for resources; can be either DataCite. Note: an account is issued to the organisation after it signs an agreement with a DataCite member, which gives it permission to register DOIs under one or more prefixes (e.g. 10.5072) in one or more domains (e.g. gbif.org). Note: confirm that the account can actually register DOIs under the IPT's domain/base URL otherwise registrations via the IPT won't work.
- Account username - the username (symbol) of the DataCite account issued to the organisation.
- Account password - the password of the DataCite account issued to the organisation.
- DOI prefix/shoulder - the preferred DOI prefix/shoulder used to mint DOIs. This prefix is unique to the account issued to the organisation. Note: always use a test prefix (e.g. 10.5072 for DataCite, 10.5072/FK2 for EZID) when running the IPT in test mode.
- Account activated - this checkbox indicates if this DataCite account is the only account used by the IPT to register DOIs for datasets. Only one DataCite account can be activated at a time.
Organisations are not available to be associated with resources until a user having the Admin role adds them. Click on the button labeled "Add" to open a page on which an additional organisation can be selected from the GBIF Registry to be used in this instance of the IPT. For explanations of the fields and selections on this page, refer to the information under the "Edit Organisation" section above. After the desired organisation is selected and all other data entered, including the password for the organisation, click on the button labeled "Save" to add the selected organisation to the list.

This page allows a user having the Admin role to enable the instance of the IPT to import and share various pre-defined types of data from the GBIF Registry. Each type includes properties (fields, terms) that support a specific purpose. For example, the Darwin Core Taxon Core Type supports information pertaining to taxonomic names, taxon name usages, and taxon concepts and allows the IPT to host resources for taxonomic and nomenclatural checklists. A distinction is made between Core Types and extensions. Core types provide the basis for data records, (Occurrence, Taxon, and Event for example) while extensions provide the means to associate additional data with a record of the Core Type. Only one Core Type can be selected for a given resource as explained under the "Darwin Core Mappings" heading of the "Resource Overview" section.
Vocabularies contain lists of valid values that a particular term in a Core Type or Extension can take. For example, the Darwin Core Type vocabulary contains all of the standard values allowed in the Darwin Core term basisOfRecord.
Following the lists of installed Core Types and Extensions, there is a section labeled "Synchronise Extensions and Vocabularies" having a single button labeled "Synchronise". The latest versions of Core Types and Extensions that exist in the GBIF Registry but have not yet been installed are listed below the Vocabularies section.

The lists of extensions (installed and not installed) each have two columns. The left-hand column shows the name of the extension as a link and a button labeled either "Install" or "Remove". If the extension is out-of-date, another button labeled "Update" will also appear. In the right-hand column is a summary of the information about the extension, including a brief description of the type of data the extension is meant to accommodate, a link to more information about the extension if it exists, the date it was issued (released), the number of properties (fields, terms) in the extension, the name of the extension, its namespace, RowType, and keywords. For more information about these attributes of an extension, see the documentation on Darwin Core Archives at http://rs.tdwg.org/dwc/terms/guides/text/. Following are the actions that can be taken with respect to extensions:
An extension can make use of lists of terms of predefined values, known as controlled vocabularies. Periodically these vocabularies may also change (e.g. if new translations have been added) and require updating in the IPT. Click on the button labeled "Synchronise" to synchronise existing vocabularies with the GBIF Registry. After the update is complete, a message will indicate if the synchronisation was successful or if there were any errors.
The title of each extension in the first column is a link to a detail page for that extension. The detail page shows all of the summary information that can be seen in the right-hand column of the extensions list as well as the detailed description, references, and examples for each of the properties in the extension.

For properties that have controlled vocabularies, the property information in the right-hand column will contain the name of the vocabulary as a link next to the label "Vocabulary:". Clicking on the link will open a detail page for the vocabulary, with a summary of the vocabulary at the top and a table of the valid values with further detailed information such as preferred and alternate terms and identifiers.

For any of the extensions that have not yet been installed in the IPT, there is a button labeled "Install" under the extension name in the left-hand column. Click on this button to retrieve the extension from the GBIF registry and install it in the IPT.
For any extension that has already been installed in the IPT, it can be removed by clicking the button labeled "Remove". Extensions that are in use to map data for any resource in the IPT cannot be removed. Any attempt to do so will show an error message and a list of resources that use the extension in a mapping.
For any extension that has already been installed in the IPT, and is out-of-date, it can be updated by clicking the button labeled "Update". Updating an extension makes it possible to take advantage of any new terms and new vocabularies. During an update, existing mappings to deprecated terms will be removed, and existing mappings to deprecated terms that have been replaced by another term will be automatically updated. Following the update, all affected resources should be reviewed and republished.

Messages generated from actions taken while running the IPT are logged to files for reference in the directory called "logs" within the IPT data directory (see the information under the "IPT Settings" heading in the "Administration Menu" section). The View IPT logs page shows messages from the file called admin.log, which contains only those log messages that have a severity of WARNING or greater (such as errors). The complete log of messages (contained in the file called debug.log) can be opened and viewed by clicking on the link labeled "complete log file". The contents of the complete log file may be useful when reporting an apparent bug.

The default About page gives information about the current IPT installation, including information about the hosting organisation, if that has been registered. This page is meant to be customized for the individual IPT instance by editing the file called about.ftl in the directory called "config" within the IPT data directory (see the information under the "IPT Settings" heading in the "Administration Menu" section). The about.ftl file is a Freemarker template that can contain a combination of HTML and variable references of the form ${host.variable!"alternate value if null"}. After making changes to the about.ftl file, the About page will have to be restarted to show the changes. Look at the default about.ftl file for examples of variables that can be included.
Here is the content of the about.ftl file resulting in the page as viewed above.
<h1>About this IPT installation</h1>

<#if host.name??>

<p>This is a default IPT hosted by ${host.name}</p>


<p>You can use the following variables about the hosting organisation:</p>

<ul>

  <li>description = ${host.description!}</li>

  <li>name = ${host.name!}</li>

  <li>alias = ${host.alias!}</li>

  <li>homepageURL = ${host.homepageURL!}</li>

  <li>primaryContactType = ${host.primaryContactType!}</li>

  <li>primaryContactName = ${host.primaryContactName!}</li>

  <li>primaryContactDescription = ${host.primaryContactDescription!}</li>

  <li>primaryContactAddress = ${host.primaryContactAddress!}</li>

  <li>primaryContactEmail = ${host.primaryContactEmail!}</li>

  <li>primaryContactPhone = ${host.primaryContactPhone!}</li>

  <li>nodeKey = ${host.nodeKey!}</li>

  <li>nodeName = ${host.nodeName!}</li>

  <li>nodeContactEmail = ${host.nodeContactEmail!}</li>

</ul>

<#else>

This IPT installation has not been registered yet.

</#if>
# About the IPT ## Citation This user manual adapts and builds upon the previous IPT User Manual (Réveillon 2009). The recommended citation for this user Manual is as follows:
Wieczorek & Braak (2015). The GBIF Integrated Publishing Toolkit User Manual, version 2.3. Copenhagen: Global Biodiversity Information Facility.
The GBIF Integrated Publishing Toolkit and this user manual are Copyright 2015 by the Global Biodiversity Information Facility Secretariat.
The GBIF Integrated Publishing Toolkit is open source software released under the Apache License Version 2.0. You may obtain a copy of this License at http://www.apache.org/licenses/LICENSE-2.0. Unless required by applicable law or agreed to in writing, software distributed under this License is distributed on an "as is" basis, without warranties of conditions of any kind, either express or implied. See the License for the specific language governing rights and limitations under the License.
This user manual is released under the Creative Commons Attribution-Non-commercial-Share Alike 3.0 Unported License. You may obtain a copy of this license at http://creativecommons.org/licenses/by-nc-sa/3.0/. Though you should consult the actual license document for details, in general terms the license states that you are free to copy, distribute, transmit, remix and adapt the work, under the following conditions:
- you must cite the work in the manner specified on this page (but not in a way that suggests that GBIF or the GBIF Secretariat endorses you or your use of the work);
- you may not use this work for commercial purposes;
- if you alter, transform, or build upon this work, you may distribute the resulting work only under the same or similar license to this one.
Details about the structure of a Darwin Core Archive, abbreviated DWCA, can be found in the "Text Guide" section of the Darwin Core web site: http://rs.tdwg.org/dwc/terms/guides/text/. Further information about the IPT's use of DWCAs can be found on this wiki page.
Send email messages to [email protected] to report problems with GBIF services, such as the GBIF Registry. Do not send IPT-specific help question to the Help Desk. Instead send them to the IPT mailing list (see below).
Use this online application to find information about organisations, IPT instances, and resources registered with GBIF: http://www.gbif.org/dataset.
This GitHub site is the project repository for all of the open source code, management, and documentation of the IPT.
Developers who wish to contribute, or to use the latest revision of the source code for their installation should consult the How to Contribute section of the IPT wiki.
The GBIF Community Site hosts a group for those interested in participating in helpdesk, promotion, and training activities related to the GBIF IPT. This is a place to exchange experiences, ask for help, and post opportunities, with the objective of a wider uptake of the tool inside and outside of the GBIF Network: http://community.gbif.org/pg/groups/3529/gbif-ipt-helpdesk-and-training-experts/.
The issue tracker is the bug report and feature request management system for the IPT software and documentation.
Subscribe to the IPT mailing list to send and receive messages related to the use of the Integrated Publishing Toolkit. This group is for users to support each other in the use of the IPT: http://lists.gbif.org/mailman/listinfo/ipt/.
This wiki page gives details about preparing a server to run the IPT and can be found on the IPT project code site wiki at http://code.google.com/p/gbif-providertoolkit/wiki/IPTServerPreparation.
This wiki page gives details about the database management systems to which the IPT can connect for a data source. The page can be found on the IPT project code site here.
GBIF provides a functional installation of the IPT for evaluation and testing purposes. The test installation of the latest release can be found at http://ipt.gbif.org.
Réveillon, A. 2009. The GBIF Integrated Publishing Toolkit User Manual, version 1.0. Copenhagen: Global Biodiversity Information Facility. 37 pp.
- Checklist Resource - a resource having information about one of many types of taxon-related lists.
- Core Type - a category of predefined sets of data properties (Taxon, Occurrence, and Event) used as the basis of a resource. Additional extensions might be linked to these Core Types when mapping data in the IPT.
- CSV file - a text file that contains data in the Comma-separated Value format.
- Data directory - the full (rather than relative) path (location) in the file structure where the data associated with the IPT instance are located.
- Darwin Core - a standard consisting of terms and classes of terms used to share biodiversity data.
- Darwin Core Archive - a single zipped archive for a data set consisting of one or more text files of data, an XML file (meta.xml) describing the contents of the text files and how they relate to each other, and an XML file (eml.xml) containing the metadata in EML about the data set.
- EML - the Ecological Markup Language is an XML-based profile used to encode metadata about a data set.
- Extension - in this user manual, an extension is a set of terms corresponding to a specific category of data. An extension should be thought of as an extension of the capabilities of the IPT rather than as an extension of any particular standard.
- GBIF Registry - a registry that manages the nodes, organisations, resources, and IPT installations registered with GBIF, making them discoverable and interoperable.
- Metadata - in this user manual, metadata refers to the information about a data set as opposed the primary data in the data set.
- Metadata Resource - a resource having information about a data set, but without having the actual primary data. A metadata resource might give information about a collection that has not yet been digitized, for example.
- Occurrence Resource - a resource having information about Occurrences as defined in the Darwin Core.
- Private - a state of a resource in which only the creator, invited managers, and IPT administrators can view it.
- Public - a state of a resource in which anyone can view it.
- Published Release - a version of the resource that has been produced by the IPT.
- Registered - a state of a public resource or of an IPT instance in which anyone can discover it through the GBIF Registry.
- Resource - in this user manual, resource refers to a data set and the metadata about it.
- Resource Managers - IPT users having a role that allows them to create, change, and remove resources.
- RowType - the category of information represented in an extension. The RowType is generally the URI of the Class that best fits the information contained in the extension.
- RSS - the acronym for Really Simple Syndication, a type of subscription format for tracking changes to a web site.
- Sampling Event Resource - A resource where the basis of the resource is sampling events as defined in the Darwin Core.
- Shortname - a short unique name used for resource identification within the IPT and services that access the IPT.
- Source Data - in this user manual, the source data are the data that are mapped to core types and extensions within a resource and may consist of text files or a database.
- Visibility - a term describing how a resource may be viewed (private, public, or registered).
This IPT wiki is no longer maintained. Please refer to the IPT User Manual.
© 2021 Global Biodiversity Information Facility
The content on this site is licensed under
