
Data manipulation is the process of modifying data so that it’s in a more organized state and therefore easier to handle. One example in which data manipulation is handy is web server logs. It’s much easier to derive meaningful stats if it’s organized nicely like which page have the most visitors or bounce rates. Python is an excellent language for data manipulation and there’s some built in modules that allows you to do it out of the box.
A Comma Separated Values file (CSV not CVS like the store) can be defined as a delimited file that uses commas to distinguish values. CSV files have roots dating back to the early 70s with mainframe computers, and it’s still popular today being the defacto data exchange format for spreadsheets and databases. A CSV file stores tabular data in a plain text file, with each line being a data record – each record has one or more fields that are separated by commas. Below is an example of how a CSV file may look:
Download the data from startup.csv on github.
The csv module which we'll discuss in detail momentarily reads and writes sequences. If coders need to read and write data from a dictionary then they can use the DictRead and DictWriter classes.
The two key functions in the csv module are reader() and writer(). Lets observe the signature for the reader()function:
csv.reader(csvfile, dialect='excel', **fmtparams)The only required argument is csvfile; dialect and fmtparams are optional. While csvfile is typically a file it can also be an object that supports the iterator protocol and returns a string every time the next() function is called; therefore, file objects and lists are suitable. If csvfile is a file object, then it must be opened with the 'b' (binary) flag on platforms where it makes a difference. The dialect parameter which is optional can be used to define a set of parameters specific to the csvfile. Last, the fmtparams argument can be used to override the individual formatting parameters in the current dialect. The below program shows how to read in a CSV file using the reader() function.
import csv
with open('startup.csv', 'r') as file:
employees = csv.reader(file)
for row in employees:
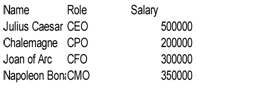
print(" : ".join(row))Name : Role : Salary
Julius Caesar : CEO : 500000
Chalemagne : CPO : 200000
Joan of Arc : CFO : 300000
Napoleon Bonaparte : CMO : 350000
Frank Roose : CTO : 375000
Mao Dong : CIO : 400000
When you pass the file into the csv.reader() function, the file is read, and the for loop is used to traverse it. The join() function returns a string in which the elements has been joined by a separator or colon in this case. If you want to write a file then you’ll need to use the csv.writer() function. Below is how the signature looks:
csv.writer(csvfile, dialect='excel', **fmtparams)Also, lets discuss the with keyword. Introduced in Python 2.5, it’s not mandatory, but it’s a good practice to include when reading and writing files as it ensures that clean-up code is done such as closing resources. You can use it as a substitute for the try/except/finally blocks. In order to write a file use the writer() function whose signature is listed below:
csv.writer(csvfile, dialect='excel', **fmtparams)Here’s an example of the function in action:
import csv
with open('software_company.csv', 'w') as employees:
    file = csv.writer(employees)
    file.writerow(["John Q", "lead software engineer", 80000])
    file.writerow(["Anon Pikes", "software engineer", 75000])
    file.writerow(["Marky M", "business analyst", 65000])
    file.writerow(["Don L", "software tester", 65000])
    file.writerow(["Lisa Z", "web developer", 72000])
    file.writerow(["Melissa J", "marketer", 50000])
    file.writerow(["Daniel K", "human relations", 55000])
The following code snippet will read in the contents of the file using DictReader() as shown below:
import csv
with open('names.csv', 'r') as files:
    names = csv.DictReader(files)
    for row in names:
        print(row['first_name'], row['last_name'])
Here's the output of names.csv:
Tiffany Fitzhugh
Tanya Krotki
Rayhan Neel
Tommy Forrester
Keir Lenard
Aurelia Hsiao
Joy Ellwood
Diya Graham
Sheila Clauss
Khadijah Harry
Download the contents of names.csv.
You could alternatively create an object and map dictionaries to output rows. You’ll need to use the DictWriter class whose details are shown below:
class csv.DictWriter(f, fieldnames, restval='', extrasaction='raise', dialect='excel', *args, **kwds)Like DictReader(), DictWriter() has seven parameters, but the first two are mandatory. Below is an example on how to use DictWriter() to write to a file in Python:
import csv
with open('high_scores.csv', 'w') as file:
    fieldnames = ['player A', 'player B']
    writer = csv.DictWriter(file, fieldnames)
    writer.writeheader()
    writer.writerow({'player A': 102920, 'player B':  120121 })
    writer.writerow({'player A': 119822, 'player B':  130921 })
    writer.writerow({'player A': 190219, 'player B':  150292 })
    writer.writerow({'player A': 192911, 'player B':  167292 })
    writer.writerow({'player A': 199919, 'player B':  178281 })
player A player B
102920 120121
119822 130921
190219 150292
192911 167292
199919 178281
Download the content of high_scores.csv.
Here's what's happening with the program. The csv module is imported, the open() function is called to open the file, and the 'w' option is used to write to it – a list with the name filenames is created and passed as the second argument of the writer() function.
The csv.DictWriter class is used and file and filenames are passed as the arguments. Once done, everything is setup using the writeheader() function which writes a row with the field names. Then, several rows of data are written using the writerow() function.
Alright, now that we’ve learned the basics of the csv module let’s do something more interesting with the data then just merely reading and outputting it.
JavaScript Object Notation aka JSON is a light-weight format used for data interchange. It’s important to know that JSON is language agnostic and many programming languages can generate and parse JSON data. JSON is used primarily to transfer data between web app and server and is an alternative to XML. The issue with XML is that it can be verbose at times adding to bandwidth consumption and download times. If you’re using AJAX to make data requests then you can easily send and retrieve objects as JSON strings.
The core methods that you should be concerned with are dumps(), dump(), loads(), and load().
dumps ---> returns a string representing a JSON object. loads ---> returns an object from a string that maps to a JSON object. load and dump ---> read/write from file instead of a string.
The dumps() method takes an object and produce a string as shown below:
>>> import json
>>> car = {'mileage': 159238.3}
>>> json.dumps(car)
'{"mileage": 159238.3}'
The loads() method is used when you want to convert a string into a JSON object. For example, let’s assume that you have the following JSON snippet below but in the form of a string in Python:
days = """
 {
   "mon": "Monday",
   "tues": "Tuesday",
   "wed": "Wednesday",
   "thurs": "Thursday",
   "fri": "Friday"
 }
"""
The string can be decoded via the loads() method.
d = json.loads(days)
d["mon"]
d["tues"]

for x in d.values():
    print(x)
The load() method is used when you want to read a file. It will take a file like object, read data from it, and use that string to create an object.
with open('superman.json') as s:
    a = json.load(s)
>>> a
The contents of superman.json will be printed to the console:
{'name': 'Clark Kent', 'alias': 'Super Man', 'nationality': ['United States', 'Krypton'], 'occupation': ['journalist', 'superhero'], 'main_villian': 'Lex Luthor', 'best_friend': 'James Olsen', 'cousin': 'Kara Zor-El', 'daily_planet_salary': 65000, 'balance': '23000', 'withdrawal': -1500.98, 'job_status': None, 'still_super_hero': True, 'wife': 'Lois Lane'}
BeautifulSoup is a Python package that's useful for parsing HTML and XML documents. It does this by creating a parse tree for parsed pages that can be used for extracting data from HTML. BeautifulSoup is a quite sophisticated parser as it can successfully parse broken HTML. At the time of publication BeautifulSoup4 is the recommended version of the package as its predecessor, BeautifulSoup3 is no longer being developed.
• BS4 is a 3rd party library provided by Crummy.com and therefore is not included in the Python Core. That means that we may have to install it. • BS4 automatically converts incoming documents into Unicode and outgoing documents to UTF-8. • According to the website BS4 parses anything you give it. • It's compatible with third party parsers like lxml and html5lib.
Below are the various ways in which you can install BS4 on your machine.
•	$ apt-get install python-bs4 (for Python 2)
•	$ apt-get install python3-bs4 (for Python 3)
If you have pip installed on your machine which is a package manager then you can install BS4 through it by using the following code:
$ pip install beautifulsoup4
Also, there's a Python module known as easy_install which is a bundled with a whole bunch of setup tools and can assist with downloading, building, installing, and managing Python packages. To install BS4 with easy_install use the following:
$ easy_install beautifulsoup4
If you don’t have pip or easy_install on your system then you can try a different approach. You can download the BS4 source tarball and install it with setup.py. Download the source for BS4.
Once the code is downloaded you can run it using the following syntax:
$ python setup.py install
BS4 comes with support for the HTML parser which is included in the Python’s standard library, but it also includes support for other third party parsers. One of the popular choices is the lxml parser which you can download through the terminal, easy_install, or pip as follows:
$ apt-get install python-lxml
$ easy_install lxml
$ pip install lxml
Another option is to use the html5lib parser which is a pure Python parser that parses HTML in a similar fashion to a web browser. The below examples show how to install the html5lib parser:
$ apt-get install python-html5lib
$ easy install html5lib
$ pip install html5lib
To confirm that everything has been installed properly type the following into the terminal:
from bs4 import BeautifulSoup
If no error propagates then that means that you’re ok. Once confirmed, it's time to move on to more interesting matters.
To parse a document with BS4 you can pass it to the BS4 constructor – you may pass in a string or a file.
We'll be using the following HTML code as an example of what we’ll be parsing. It’s just a simple HTML code that includes a prospective list of the college football teams for the current season.
You can download the contents of site.html on GitHub.
Below is an example of how to pass in the contents of site.html into the BS4 constructor:
from bs4 import BeautifulSoup
with open('site.html') as f:
    soup = BeautifulSoup(f)
>>> soup
The BeautifulSoup library is imported and then the HTML file is opened via the with() function. The BeautifulSoup() constructor is created and the file, or f is passed to it. Next, the file is printed which displays the contents of the HTML tag.
BeautifulSoup transforms the HTML document into a complex tree of Python objects. Most Python developers will typically only have to worry about four objects which are: Tag, NavigableString, BeautifulSoup, and Comment.
This corresponds to a XML or HTML tag in the original document. An example of it in action is listed below:
with open('site.html') as f:
    soup = BeautifulSoup(f)
    tag = soup.tr
>>> tag
<tr>
<td>Rank </td>
<td>Team</td>
<td>Rec</td>
<td>Pts </td>
<td>Trend </td>
</tr>
The tag object generates the content between the tag. Tags have many attributes and methods with the main ones being its name and attributes. You can change the tag’s name as shown below:
tag.name = 'row'
>>> tag.name
'row'
>>> type(tag)
<class 'bs4.element.Tag'>Every tag has an associated name which can be accessed via .name.
>>> soup.tr.name
'tr'
>>> soup.td.name
'td'
>>> soup.body.name
'body'A tag may have an infinite number of attributes. The tag can be accessed directly using the .attrs attribute, or you can access specific elements of it using subscript notation. Both methods are shown below:
with open('site.html') as f:
    soup = BeautifulSoup(f)
    tag = soup.link
>>> tag
<link href="css/styles.css?v=1.0" rel="stylesheet"/>
>>> tag.name
'link'
>>> tag.attrs
{'rel': ['stylesheet'], 'href': 'css/styles.css?v=1.0'}
>>> tag['rel']
['stylesheet']
>>> tag['href']
'css/styles.css?v=1.0'
Also, you can add, remove, and modify a tag’s attributes by treating the tag as a dictionary as shown in the following example:
>>> tag['stuff'] = 'New attribute'
>>> tag['test'] = 'Test'
>>> tag.attrs
{'rel': ['stylesheet'], 'href': 'css/styles.css?v=1.0', 'stuff': 'New attribute', 'test': 'Test'}
>>> del tag['test']
>>> tag.attrs
{'rel': ['stylesheet'], 'href': 'css/styles.css?v=1.0', 'stuff': 'New attribute'}
A string is a bit of text within a tag. For example:
with open('site.html') as f:
        soup = BeautifulSoup(f)
        tag = soup.p
        tag.string
' This is a ranking of the top 25 NCAA football rankings. '
You can replace a string with another by using the replace_with() method as shown below:
>>> tag.string.replace_with("Top 25-Rankings")' This is a ranking of the top 25 NCAA football rankings.'
>>> tag<p>Top 25-Rankings</p>
Parsing a XML document is pretty much the same as parsing a HTML document with the exception that you pass in a second parameter which will be the XML parser: lxml or html5lib. Let’s assume that the XML document that we want to parse is listed below. Its filename is book.xml.
<?xml version="1.0" encoding="UTF-8"?>
<book>
  <title> Java for Newbies. </title>
  <subject> computer programming </subject>
  <author> Dougie Doug </author>
  <description> Master the basics of the Java core </description>
  <pages> 292 </pages>
  <price> 180 </price>
</book>
Below is an example on how to read in the XML file via BS4 using the xlib parser:
from bs4 import BeautifulSoup
with open('book.xml') as site:
    soup = BeautifulSoup(site, 'lxml')
>>> soup
To read in the XML file using the html5lib parser is pretty much the same except you use html5lib as the second parameter indicated below:
soup = BeautifulSoup(site, 'html5lib')Once the file is read into memory and passed into the BeautifulSoup constructor the file be manipulated. The way to manipulating XML is similar to manipulating the HTML file. For example, look at the following coding snippets:
>>> soup.title
<title> Java for Newbies. </title>
>>> soup.subject
<subject> computer programming </subject>
>>> soup.author
<author> Dougie Doug </author>
>>> soup.description
<description> Master the basics of the Java core </description>
>>> soup.pages
<pages> 292 </pages>
In BS4, there’s no class for parsing XML. Instead, you pass in XML as the second argument in the BeautifulSoup constructor.
Let’s parse some data. Using the same HTML file we worked with in this chapter (site.html) lets use BS4 to traverse all of the elements in it. Here’s how the output of the first several tags should look:
html head meta title meta meta link body h1 p table tr td td td td td