Sceneの読み込み履歴を保持し、履歴からSceneを読み込むエディタ拡張


<< Description | Demo | Download | Usage >>
What's new? See changelog 

Do you want to receive notifications for new releases? Watch this repo 

シーン「Menu」を開いてから、次にシーン「Game」を開いて、またシーン「Menu」を開いて...
こういったシーン切り替え操作は、みなさんよく経験されると思います。
切り替え方法としては、Projectウィンドウでシーンをクリックする方法が一般的だと思います。
- Projectウィンドウの「お気に入り」(または該当フォルダ)をクリック
- シーンをダブルクリック
"2"クリックしないといけないですね。めんどくさい!
そこで、"1"クリックでシーン切り替えが出来るようにエディタ拡張を作りました!

- Download unitypackage from Releases.
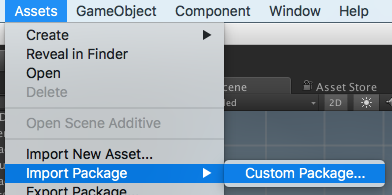
- Import the package into your Unity project. Select
Import Package > Custom Packagefrom theAssetsmenu.
- Open scene history window from
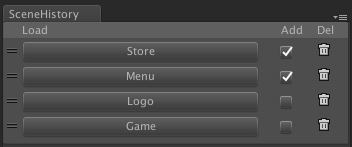
Windows > Scene Historymenu. - When the scene is opened, add a history.
- You can open the scene from the history.
- Enjoy!
- Unity 5.5+ (included Unity 2018.x)
- No other SDK are required
- MIT
- GitHub page : https://github.com/takupisu/SceneHistory-Unity
- Releases : https://github.com/takupisu/SceneHistory-Unity/releases
- Issue tracker : https://github.com/takupisu/SceneHistory-Unity/issues
- Current project : https://github.com/takupisu/SceneHistory-Unity/projects/1
- Change log : https://github.com/takupisu/SceneHistory-Unity/blob/master/CHANGELOG.md