Skypad Software Setup Guide
This section provides information regarding software setup of the Jetson and PixFalcon.
-
Install JetPack L4T 3.1 per the Redtail Jetson-Setup guide, including the J120 Jetson TX2 firmware patch. Some components like VisionWorks Pack and Compile CUDA Samples can be skipped during the JetPack install process (right click on the "Action" field in the list of installation components) to save space. The default username/password for the Jetson are
nvidia/nvidia. -
Create a Wi-Fi access point using the Ubuntu Network Manager (you may need to fix the
op_modeparameter; see this guide). For example: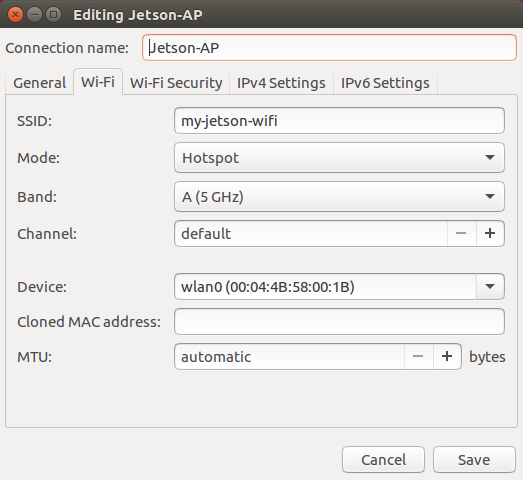
Once you've created a Wi-Fi access point, make sure that you can
sshinto the Jetson by connecting to the Wi-Fi from your host computer and runningssh [email protected]. The Wi-Fi access point will be broadcast after every boot, allowing you to interact with the Jetson easily once it has been attached to the drone. -
If you'd like to use PX4FLOW, ZED, ORB_SLAM2, or any other offboard control of the PixFalcon, we suggest using the setup script from the NVIDIA Redtail repo to install ROS and MAVROS. This will install ROS and set up the ROS workspace in
~/ws/. Once the script is finished, log out and log back in to make sure that all ROS environment variables are initialized.
cd ~
git clone https://github.com/NVIDIA-Jetson/redtail.git
./redtail/ros/scripts/jetson_ros_install.sh- Download and install QGroundControl on your host machine.
- Connect the GPS/Compass to the PixFalcon.
- Using the provided USB cable, connect the PixFalcon to your host machine, and launch QGroundControl.
- Using QGroundControl, install PX4 firmware 1.7.0. Install px4fmu-v2_lpe.px4, so that we can use PX4FLOW based position stablization.
- Run through the initial setup process for the PixFalcon in QGroundControl. Please note that although the video uses Pixhawk, the process is completely identical for PixFalcon.
- Run through the compass calibration process in QGroundControl as well.
- Set the following parameters on the PixFalcon in QGroundControl. Optionally you can import these settings from the redtail/tools/platforms/skypad/px4settings.params file.
| Page | Parameter | Value |
|---|---|---|
| Local Position Estimator | LPE_FAKE_ORIGIN | 1 |
| Local Position Estimator | LPE_FLW_QMIN | 75 |
| Local Position Estimator | LPE_FUSION | 210 (fuse optical flow, fuse land detector, flow gyro compensation, fuse baro) |
| Local Position Estimator | LPE_LAT | 0.0 deg |
| Local Position Estimator | LPE_LONG | 0.0 deg |
| Local Position Estimator | LPE_VXY_PUB | 0.8 m/s |
| Multicopter Position Control | MPC_TAKEOFF_ALT | 1.5 m |
| Multicopter Position Control | MPC_ALT_MODE | Terrain Following |
| Multicopter Position Control | MPC_XY_VEL_MAX | 2.0 m/s |
| Multicopter Position Control | MPC_XY_P | 0.5 |
| System | SYS_COMPANION | Companion Link (921600 baud, 8N1) |
| System | SYS_MC_EST_GROUP | local_position_estimator, attitude_estimator_q |
To be able to communicate to the PixFalcon over the TELEM1 port, we need to change the port used by the PixFalcon’s MAVLink software.
-
Using a micro SD card reader, connect the PixFalcon’s micro SD card to your host computer for editing.
-
Create an
/etc/extras.txtfile on the PixFalcon card containing the following two lines:mavlink stop-all mavlink start -d /dev/ttyS1 -b 921600 -r 20000 -m onboard
Since MAVLink is now running on a different port, this change will disable QGroundControl over the Pixfalcon USB port. To control the PixFalcon from QGroundControl after performing this modification, either launch QGC on a host computer when connected to the Jetson's Wi-Fi hotspot (after starting MAVROS via SSH), or remove extras.txt from the SD card.
The ZED camera can be used to provide stereo vision-based pose estimates to the PixFalcon. Here, we provide introductory instructions for installing the basic ZED software and reading pose estimates.
To install and run the ZED software on Jetson:
-
If you haven't already done so, run the Redtail ROS setup script:
cd ~
git clone https://github.com/NVIDIA-Jetson/redtail.git
./redtail/ros/scripts/jetson_ros_install.sh
-
Set the Jetson to Max-N power mode (consuming more power, but improving performance).
sudo nvpmodel -m 0
-
Install packages required for the ZED:
sudo apt-get install -y libcv-bridge-dev libeigen3-dev ros-kinetic-cv-bridge libpcl1 ros-kinetic-pcl-ros ros-kinetic-tf2-geometry-msgs ros-kinetic-tf-conversions ros-kinetic-rviz ros-kinetic-robot-state-publisher
-
Connect the ZED camera to the Jetson carrier board USB3.0 port.
-
With the ZED camera connected to the Jetson (so that the installer can identify the serial number and download the appropriate camera calibration file), install the ZED SDK for Jetson TX2 (saying yes to dependency installs when prompted):
# Connect ZED camera!
wget https://www.stereolabs.com/developers/downloads/ZED_SDK_Linux_JTX2_v2.2.1.run
# If this link doesn't work, you can get the most recent SDK from https://www.stereolabs.com/developers/
chmod +x ZED_SDK_Linux_JTX2_v2.2.1.run
./ZED_SDK_Linux_JTX2_v2.2.1.run
-
Install the
zed-ros-wrapperROS package:cd ~/ws/src/ git clone https://github.com/stereolabs/zed-ros-wrapper.git cd .. catkin_make source ./devel/setup.bash
-
The
zed-ros-wrapperpackage provides helpful launch files. To test the ZED software, runroslaunch zed_wrapper display.launch. To run the software (including odometry broadcasting), useroslaunch zed_wrapper zed.launch; the pose will be broadcast on theodomchannel by default as anOdometrymessage (see the launch file), so you will need to rebroadcast it as aPoseStampedmessage to work with MAVROS.

This work is licensed under a Creative Commons Attribution 4.0 International License