Crust Profit Ark Single Node Setup
Guide for Single Nodes in first-Stage “Profit Ark”
In this tutorial, we will introduce how you can become a Validator/Candidate or a Merchant to obtain corresponding revenues in Crust network. Specifically, we will cover such aspects as the selection of hardware equipment, operating system settings, as well as the startup and use of related Apps to help you join Crust incentivized testnet. It should be noted that some Linux pre-knowledge is expected of you by this tutorial, and please do follow our guideline steps and do not skip any of them. If you have any questions, please contact the Crust official.
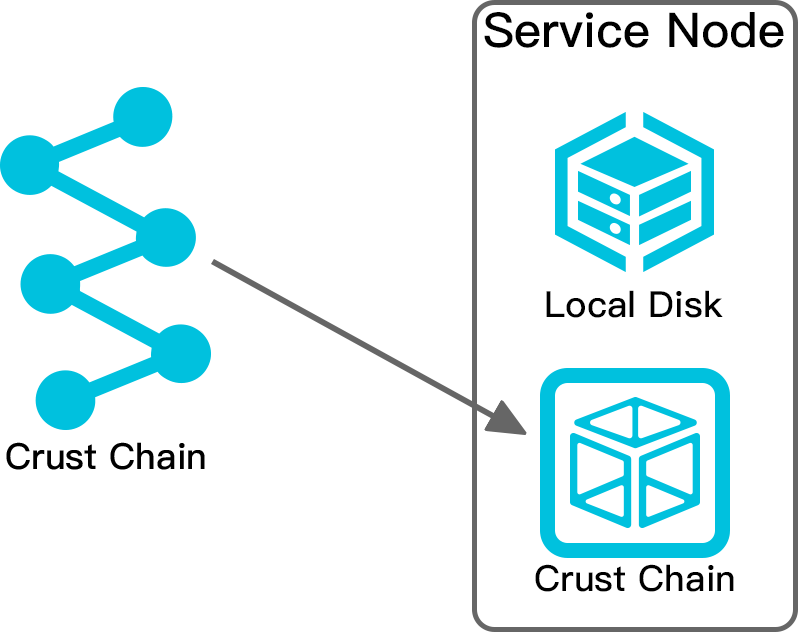
In the single-node mode, your single node needs to have both chain module and storage module run. Since the block generation and the storage work reporting processes pose high requirements for network stability, we strongly recommend that the Kusama network or other projects similar to Polkadot ecology use a fixed public IP for block generation, in case of an unstable block generation that may bring losses.
Below is a single-node topology diagram:
For detailed configuration requirements and recommendations, please refer to the official hardware spec.
Check here for how to create Crust Accout
In most cases, the SGX (Software Guard Extensions) module of a device is turned off by default, and we need to set it in BIOS. First, we switch the BIOS SGX to "enable", and turn off Secure Boot (some motherboards may not have such an option). If you find the SGX only with a "software enabled" option, please refer to https://github.com/intel/sgx-software-enable.
a. Download
wget https://github.com/crustio/crust-node/archive/v0.7.0.tar.gzb. Unzip
tar -xvf v0.7.0.tar.gzc. Enter the installation directory
cd crust-node-0.7.0Please note before installation:
The program will be installed in the /opt/crust path, please make sure that there is more than 100G of SSD space available in the path

If you have run Crust incentivized testnet before, please close the program and clear the data before the installation.
For details, please refer to section 8.2

The installation process involves downloading related dependencies and docker images, which may be a little time-consuming and may even fail due to unexpected network problems. If this does occur, please repeat installation actions until it is 100% complete.
The installation command is:
sudo ./install.sh --registry cnExecute the following command to edit the node configuration file (for those who are not familiar with vim actions, please refer to this tutorial, or use other linux file editors)
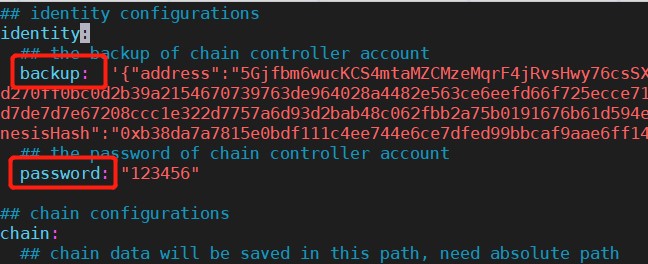
sudo vim /opt/crust/crust-node/config.yamlModify the value of "backup" and "password" in config.yaml. "backup" is the file backed up when creating a Controller account, and "password" is the password of the Controller account. The format is as follows:
Modify the "name" in config.yaml. The "name" represents the name of the Crust chain node, which can be named freely (but with no space):

Configure the node storage path and capacity by modifying "srd_paths" and "srd_init_capacity". The storage capacity will be reported to Crust network as reserved storage. This will determine the upper limit of the amount that can be guaranteed by others on your chain, as well as the number of orders that you can take. A single node can configure at most 200TB of reserved storage.
Take this as an example. Suppose that the mounting paths of your two hard disks A and B are /harddisk1 and /harddisk2, and their remaining storage space is 1500G and 600G respectively. You can configure parameters as such: setting "srd_paths" as /harddisk1 and /harddisk2 (absolute path requested here), and setting "srd_init_capacity" as 2000G. After this configuration, the reserved storage capacity reported by you would be 2000G. The configuration is as follows:

First, please make sure that the following interfaces are not occupied: 30888, 19944, and 19933 (the three required by crust chain), as well as 56666 (required by crust API) and 12222 (required by crust sWorker). Then open the P2P port of the chain. The command is:
sudo ufw allow 30888The start-up command is:
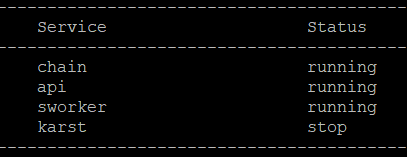
sudo crust start Execute the following command to check out the running status of crust:
sudo crust statusThe status of the top three services in the following window indicate a successful startup:
Execute the following command to monitor the process and press ctrl-c to end:
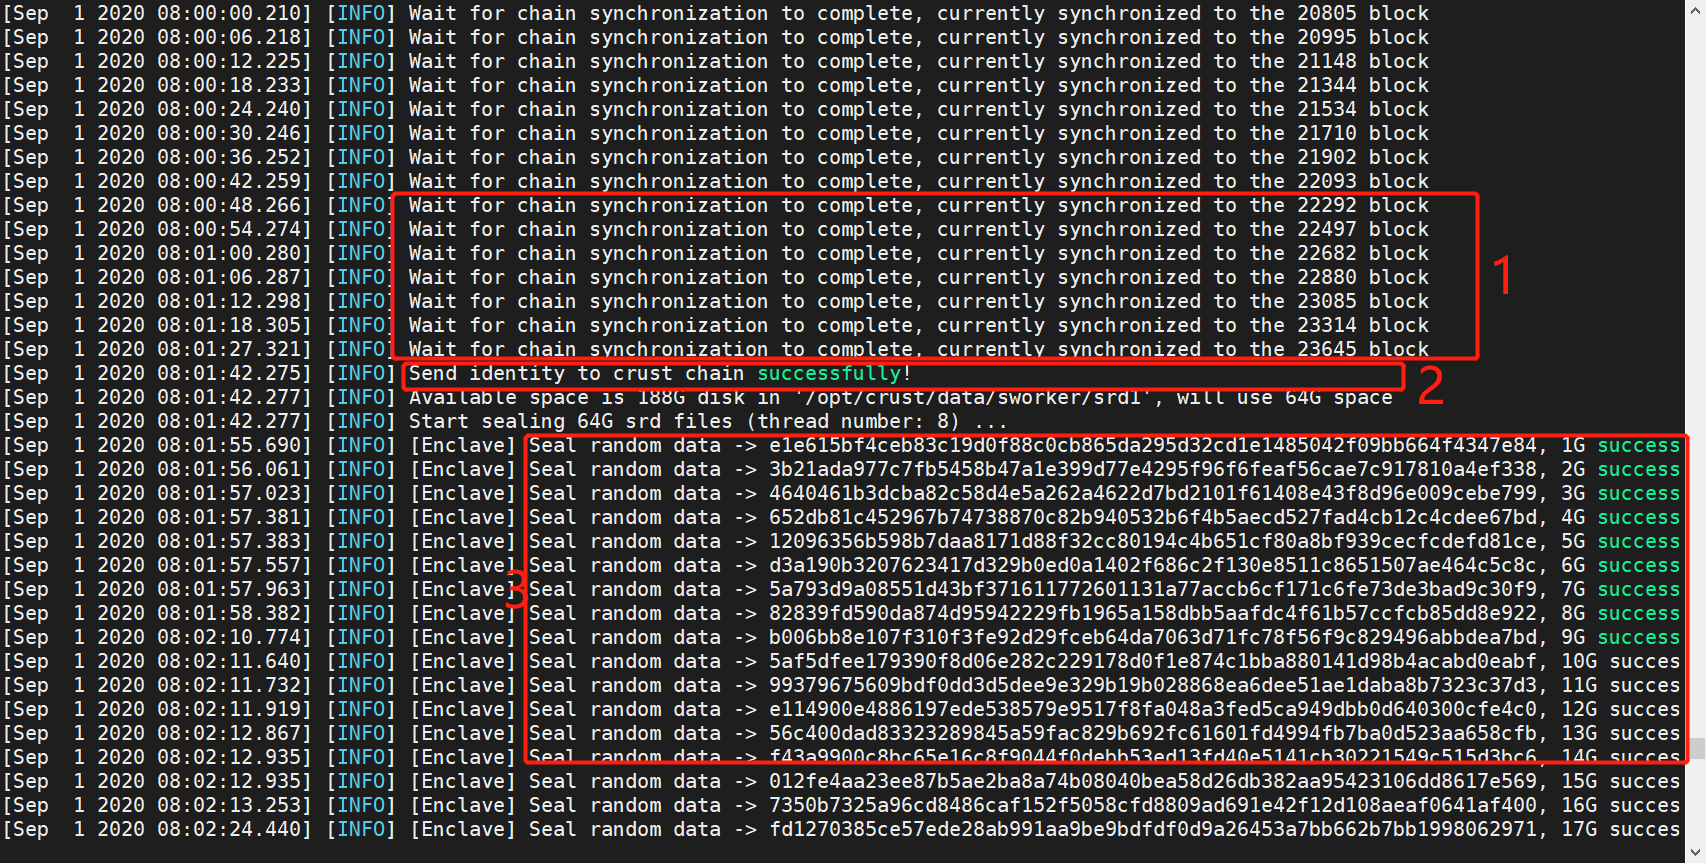
sudo crust logs sworkerMonitoring logs are as follows:
-
The block is being synchronized, which takes time.
-
The identity has been successfully registered on the chain.
-
Remaining storage is being calculated, which takes place in steps.
-
The work has been reported successfully, which takes time.

Execute the command:
sudo crust tools rotate-keysThe result returned is the session key of the node, please copy it, which will be used in next steps:

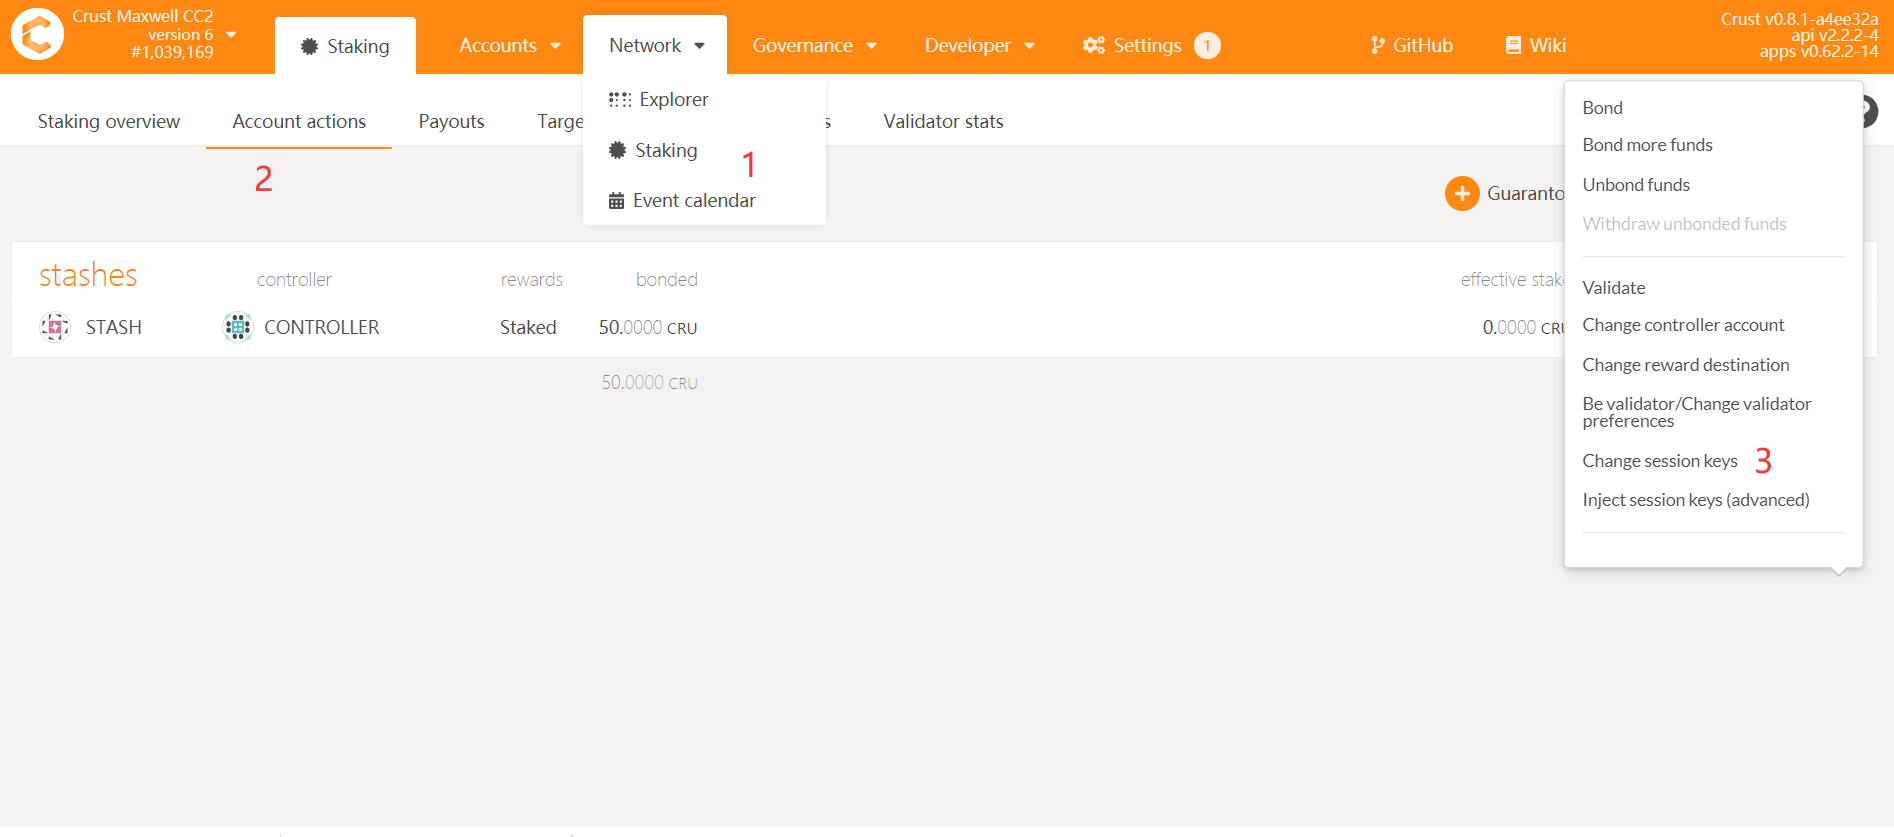
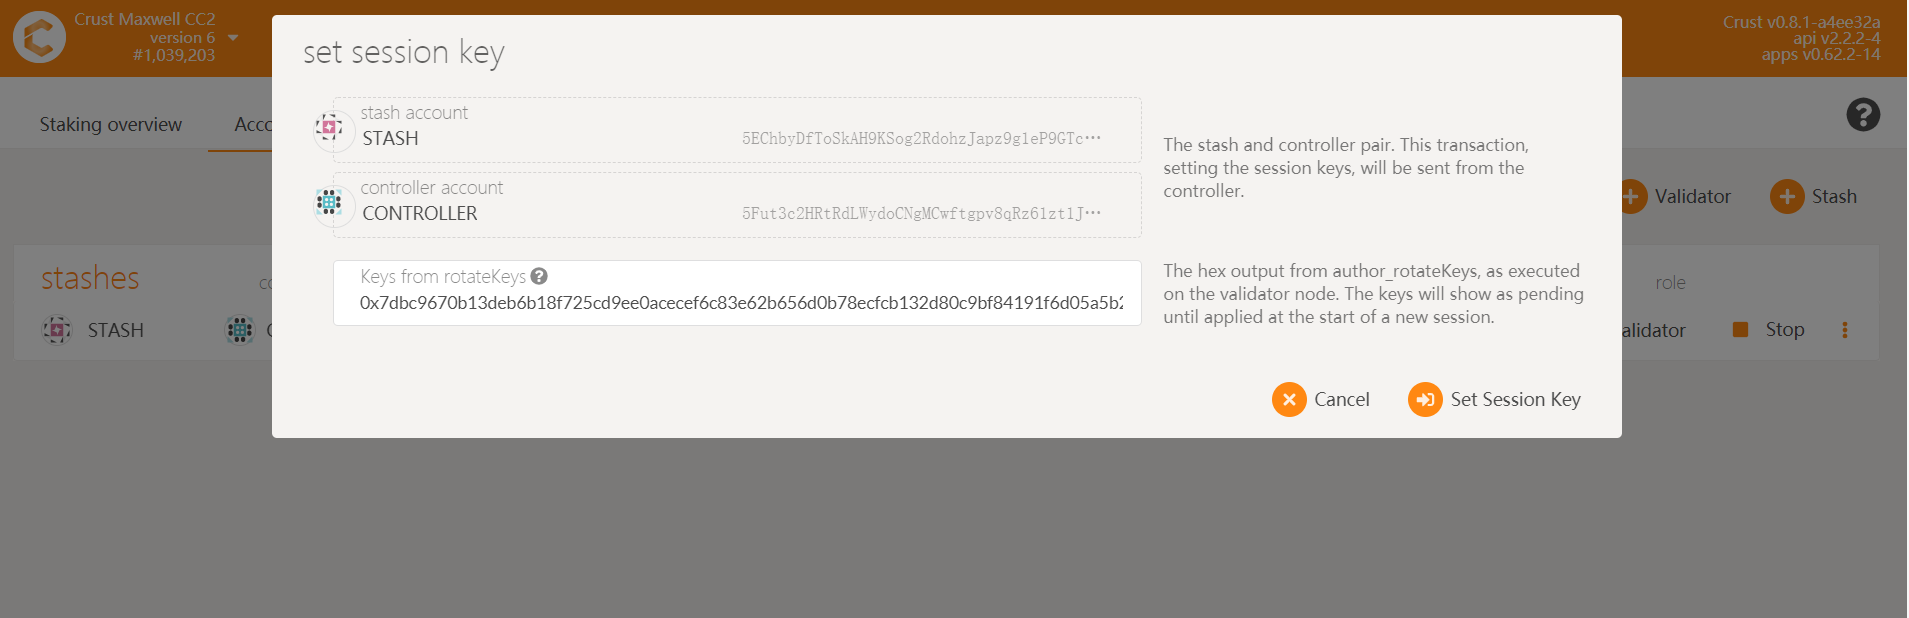
Enter CRUST APPs, select "Staking" from "Network" in the navigation bar, click "Account actions", select "Change session keys", click "set session key" on the right, fill in the sessionkey (obtained from 7.1), and send the transaction.
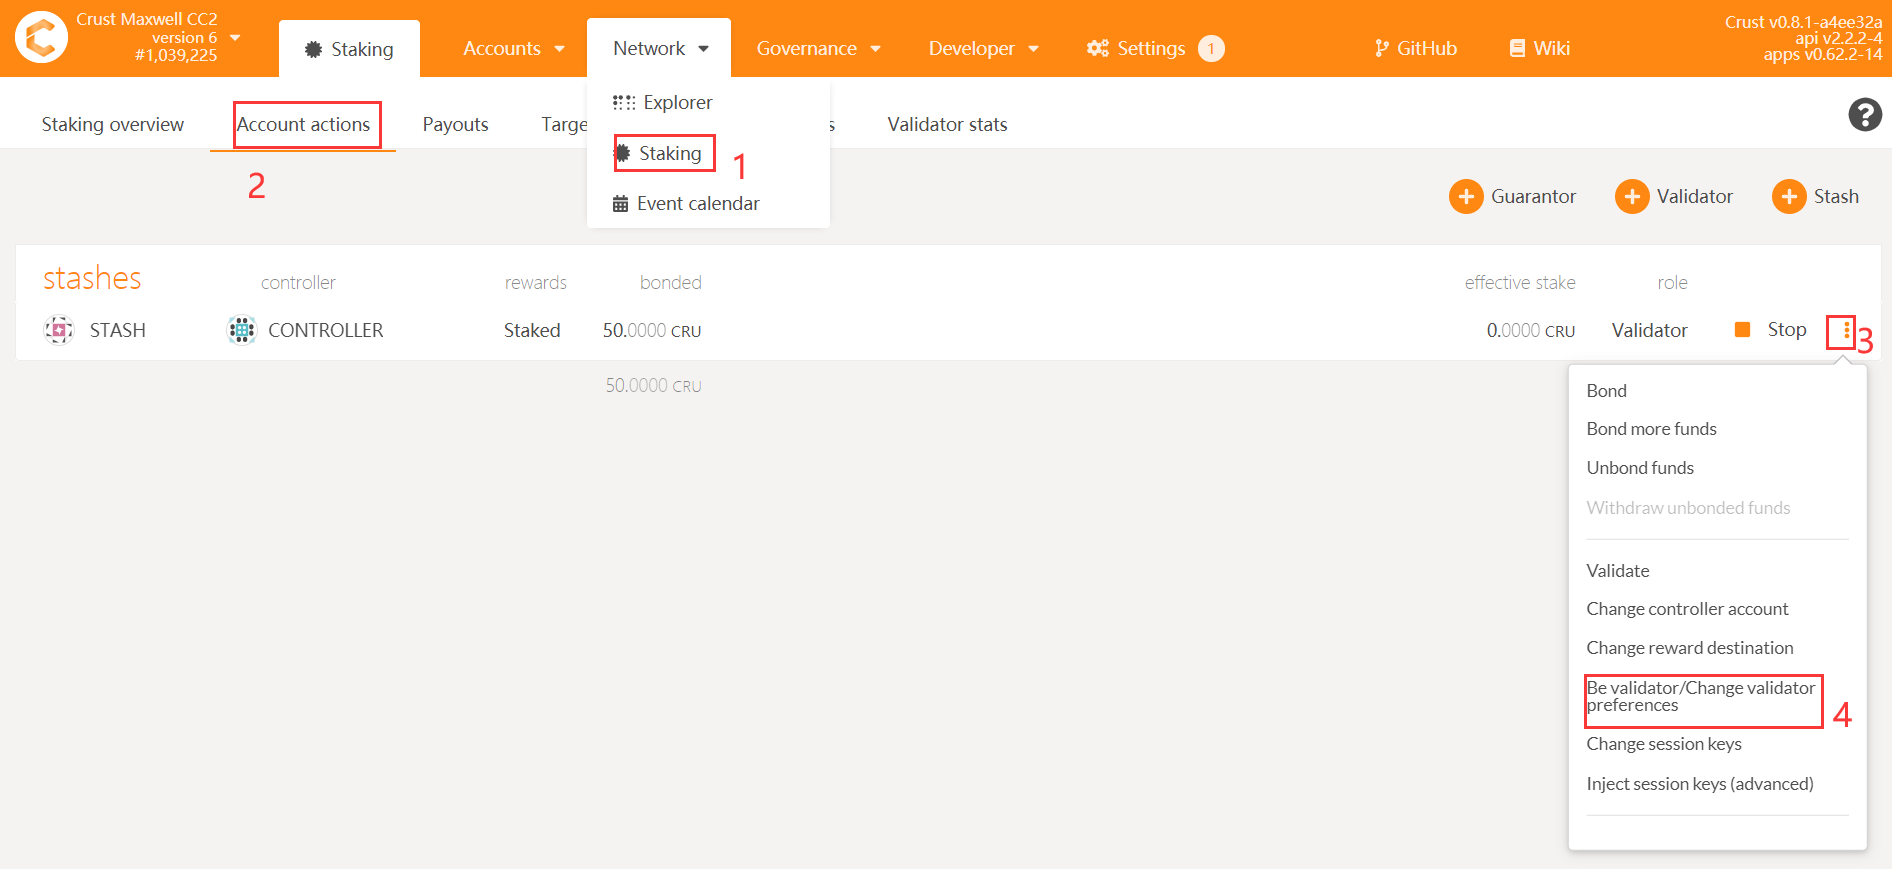
Open Crust APPs and perform the "Be validator/ Change validator preference" action.
If your device needs restarting, or any Crust node related programs need restarting under certain circumstances, please refer to the following steps. It should be noted that this section only includes startup steps of Crust node related programs. Procedures concerning software/hardware environment settings and inspections. Please perform the following actions with a software and hardware system normally operating:
sudo crust reloadIf you have run an old version of the test chain before or want to redeploy it, you need to clear data in the following three paths.
- Basic data of Crust are placed in /opt/crust/data by default, please clear the files in it
- laceholder data are stored in the "srd_paths" you configured earlier, please clear data there
- Node data are stored in /opt/crust/crust-node, please execute the following command to uninstall: sudo /opt/crust/crust-node/scripts/uninstall.sh